Before Buying: About AmpliFi
AmpliFi offers several model options to meet each home's different networking needs. The AmpliFi kits offer a more robust solution, but many times the powerful standalone router (AFI-R) will be enough to provide internet to all corners of the home. Additionally, you can build your own system with our standalone products, customizing AmpliFi to fit your specific needs. See the Compatibility Guide below to learn which devices you can use to expand your network.
This article includes a brief description of the AmpliFi models, but please see the full specifications tables in the product Datasheets before deciding to purchase a device.
Coverage
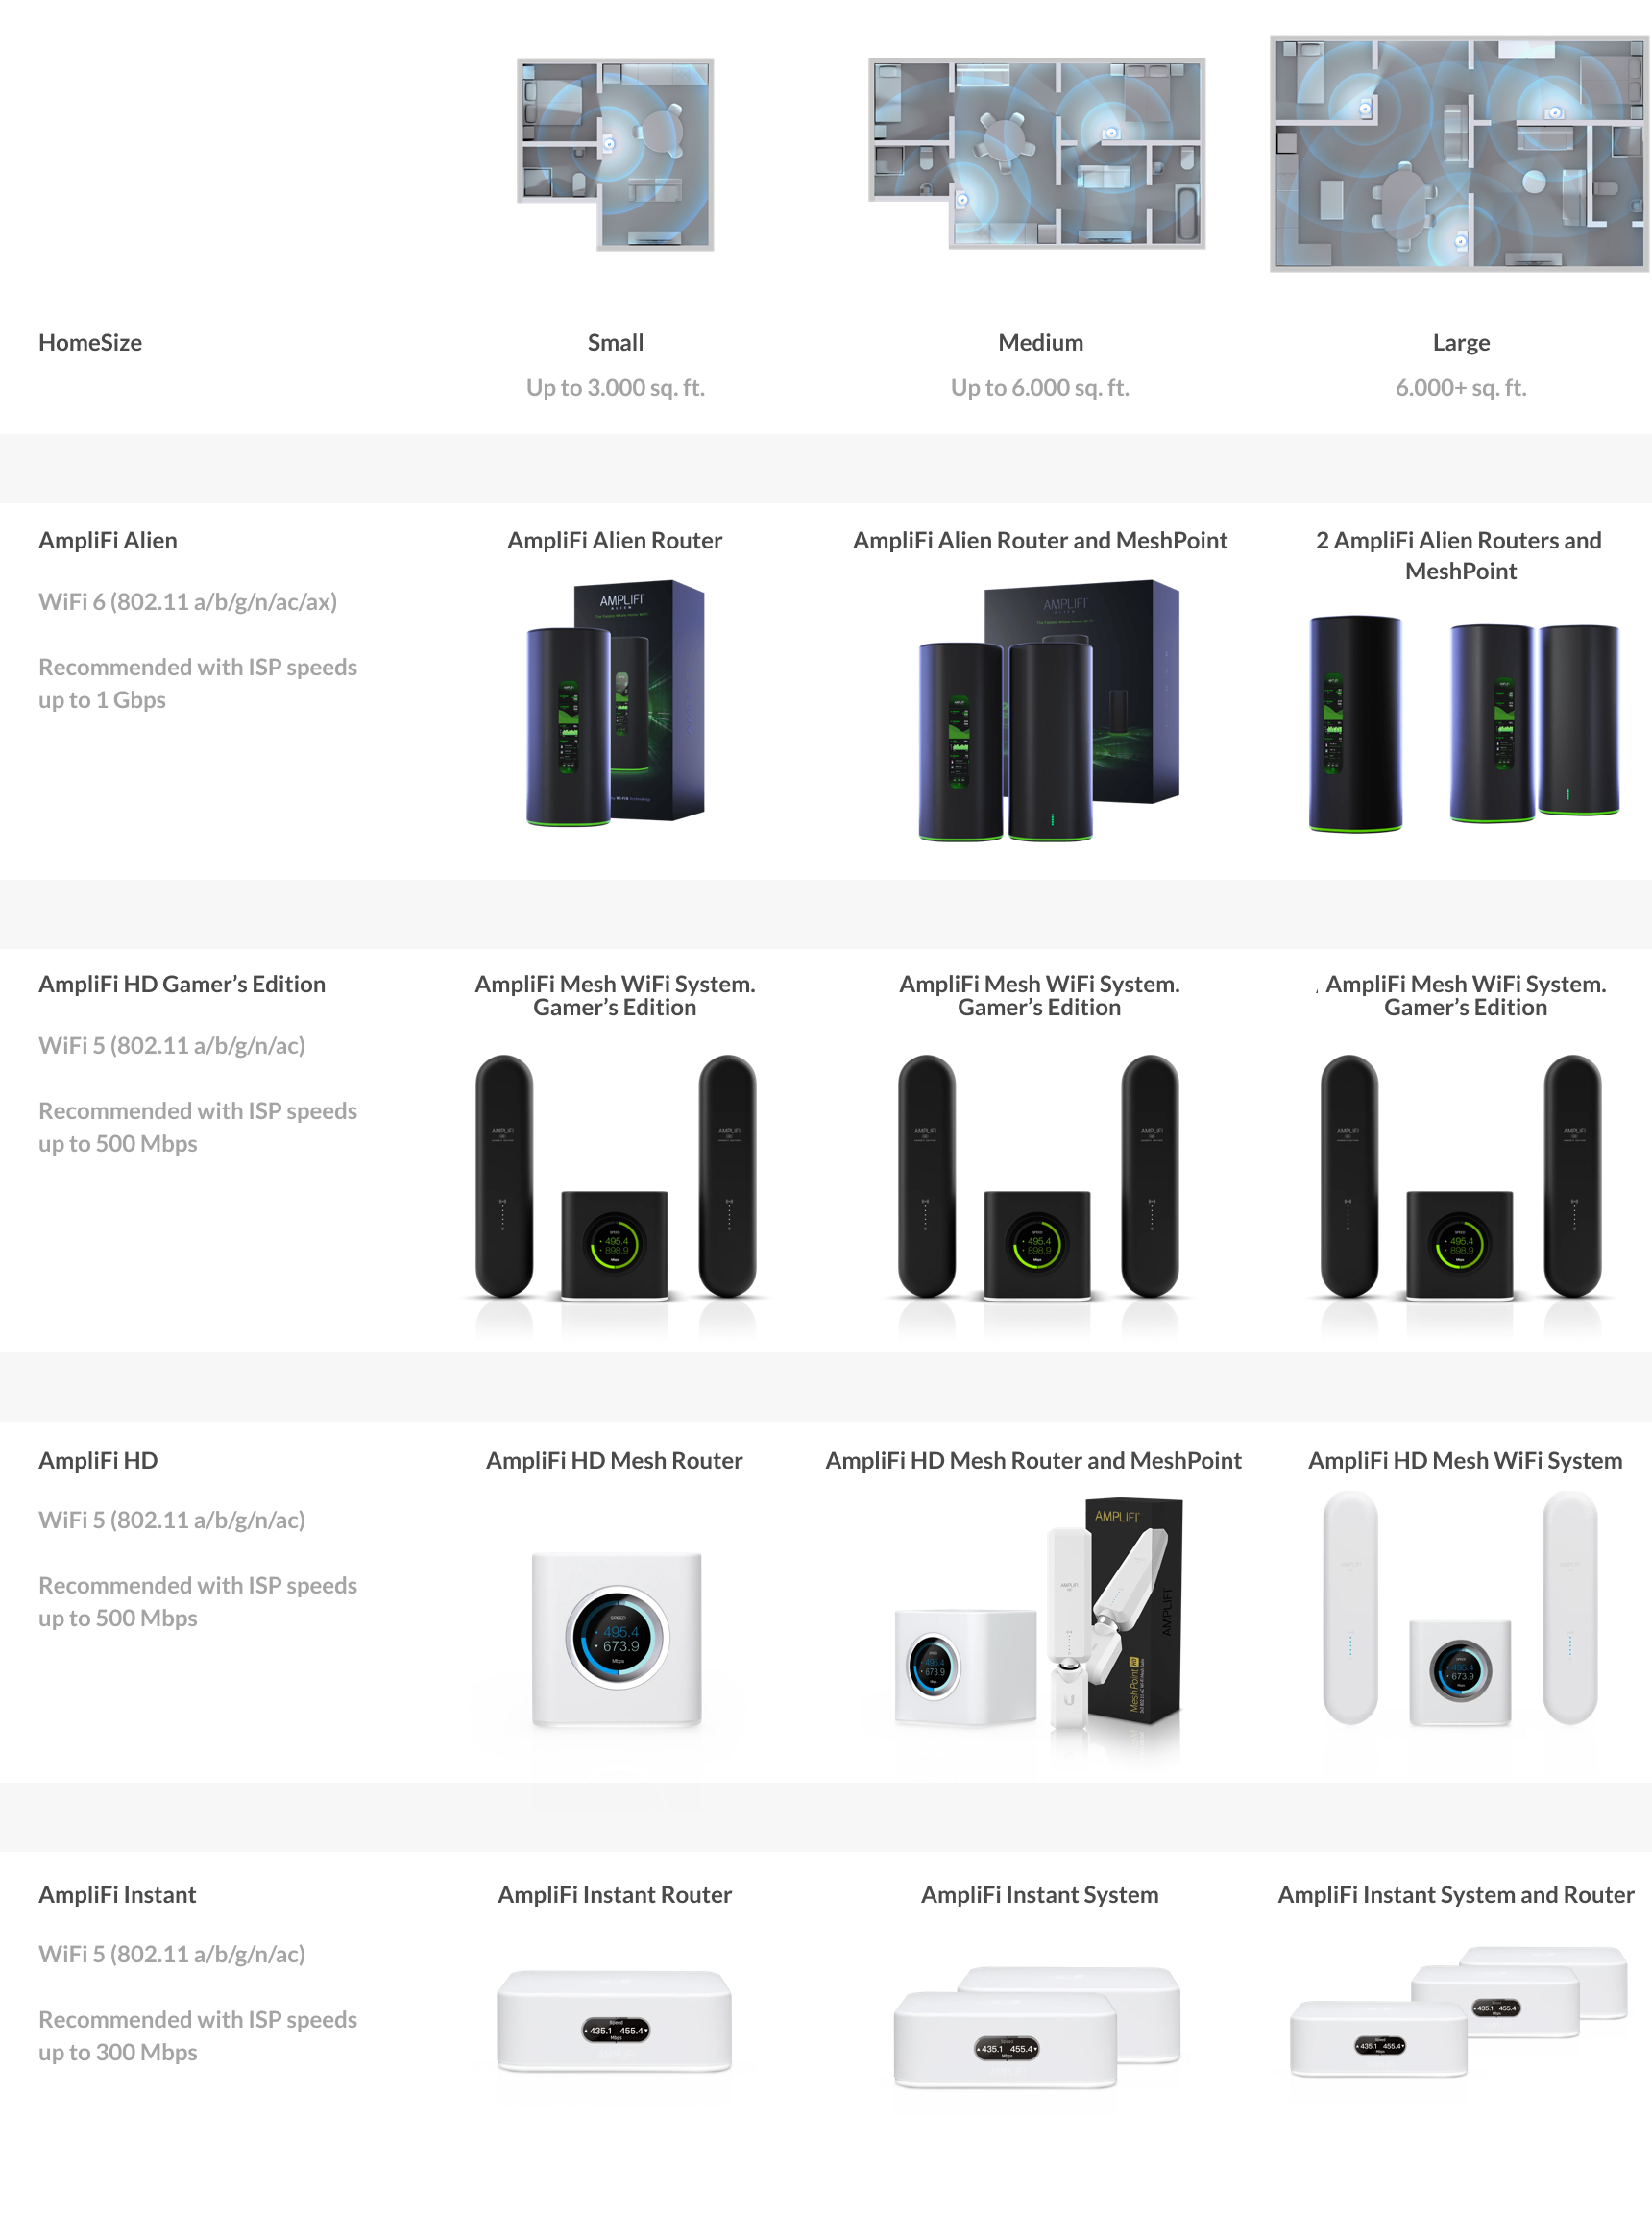
AmpliFi Kits
- AmpliFi HD System (AFI-HD): This kit includes a router base station and two wireless super mesh points for more WiFi coverage throughout your home.
- AmpliFi Instant WiFi System (AFI-INS): Includes a router with an easy-to-use touchscreen display, 1 Gigabit Ethernet port, a WAN port, an Ethernet cable, and one MeshPoint with an Ethernet port to maximize coverage and eliminate dead zones in your home.
- AmpliFi HD Gamer’s Edition (AFI-G): This kit is equipped with a GeForce NOW QoS mode, developed by Ubiquiti with NVIDIA’s support to quickly adjust networks for optimal game-streaming performance.
- AmpliFi Alien (AFI-ALN): This kit includes the AmpliFi Alien router with the latest 802.11ax WiFi 6 technology and an AmpliFi Alien meshpoint with 1 Gigabit WAN port which can be used for ethernet backhaul connection.
Important Devices sold in kits are hard-coded to one another and cannot be paired to other devices. The mesh system can be expanded by adding as many standalone mesh units as needed. To verify if your devices are standalone, see this article; or see the list of standalone units below.
AmpliFi Standalone Devices
- Standalone HD Mesh Router (AFI-R) is great for powerful coverage in an average sized space. Additionally, the standalone mesh router can be a powerful tool when added to existing AmpliFi systems.
- Standalone MeshPoint HD (AFI-P-HD) is a fantastic solution for not only adding distance and coverage to existing AmpliFi units, but also works with third party routing solutions. Please note that the MeshPoint will not provide internet on its own, it must be paired to a router.
- AmpliFi Instant (AFI-INS-R) is a simple and quick setup solution designed for ease of use, while still packing that AmpliFi punch for long range needs.
- AmpliFi Alien (AFI-ALN-R) With the latest 802.11ax WiFi 6 technology, AmpliFi Alien delivers 4x the overall network capacity and 2x the coverage while reaching true Gigabit speeds. It features a tri-band radio with 2.4GHz and 5GHz 802.11ax radios optimized for WiFi 6 performance and backwards compatibility with previous WiFi standards. AmpliFi Alien is not compatible with other AmpliFi models. To expand an Alien network, add another standalone Alien router.
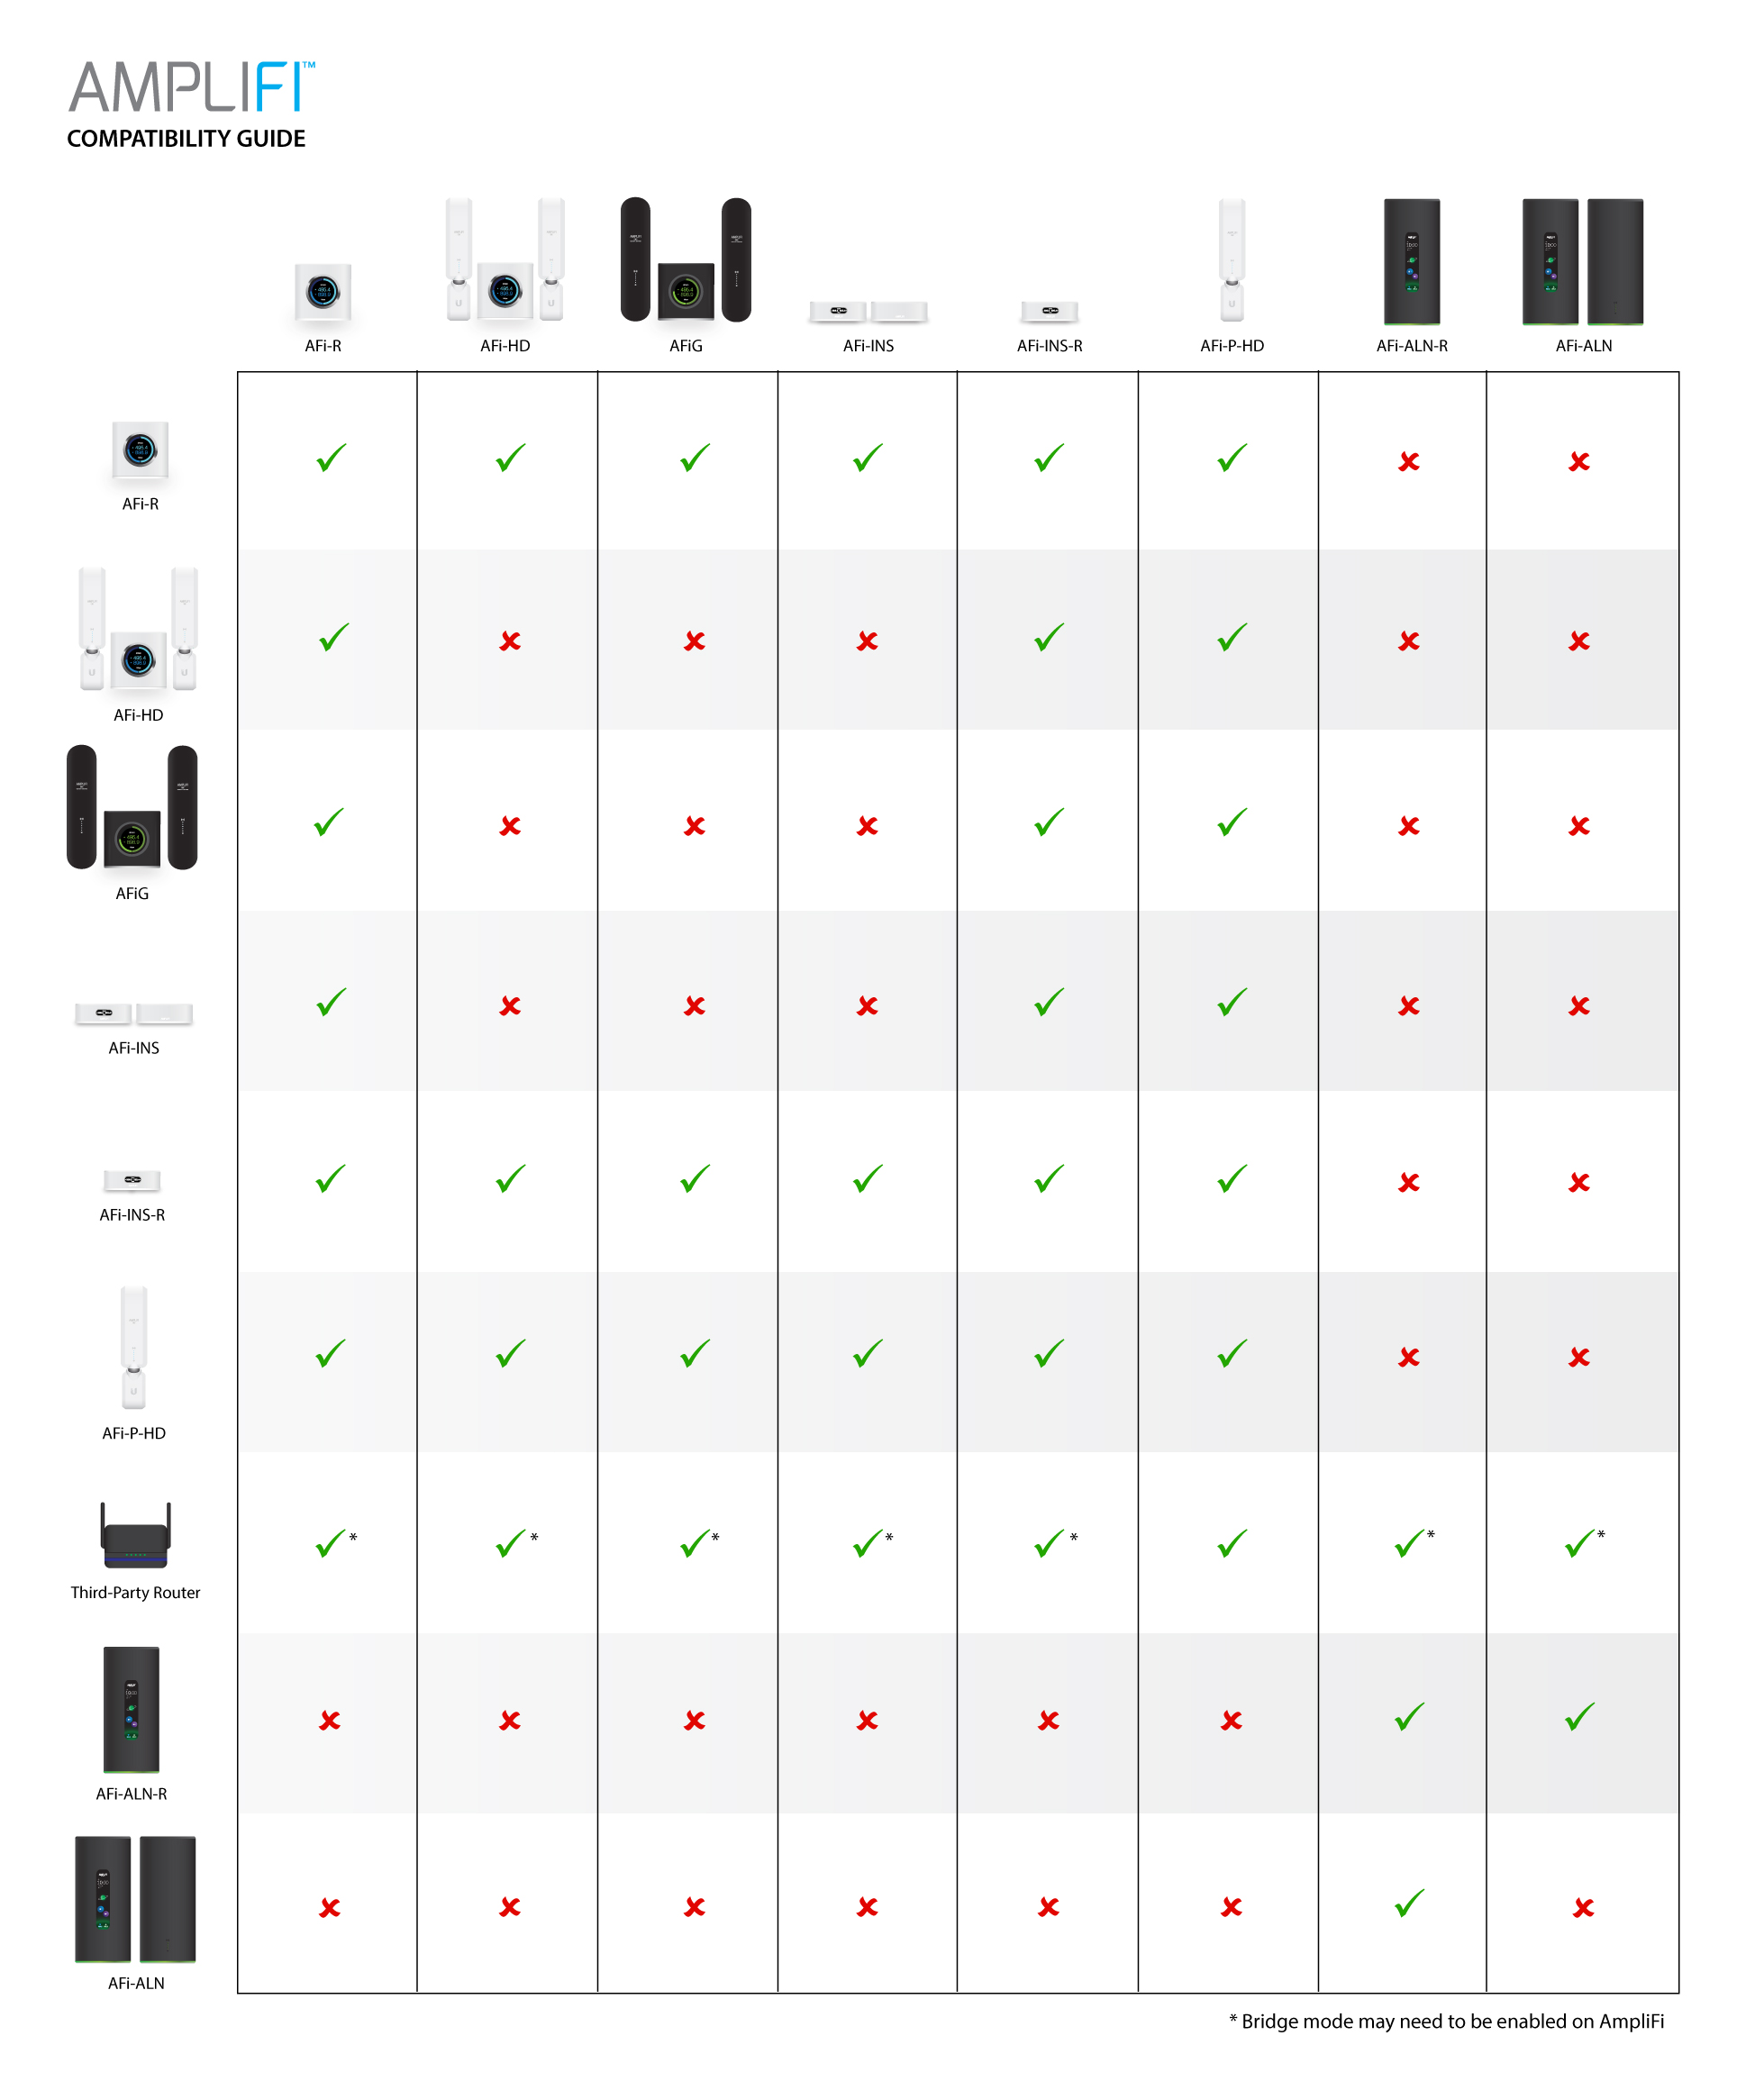
Compatibility Guide
This compatibility guide illustrates which models are compatible for meshing and pairing; check marks indicate compatibility. For example, if you have an AFi-HD and are thinking about expanding your system, a quick glance at the table will show you that you can expand your network with an AFi-R and a AFi-INS-R, but not with another AFi-HD.
The kits cannot be used to expand single router systems, but standalone routers can be used to expand kits if compatible in the table below.
Please note that the Teleport VPN feature is now available without any extra hardware: with the Teleport App or Router to Router Teleport modes, and is compatible with all our routers: HD, Instant, Gamer and Alien. Teleport hardware device is not compatible with Alien.
 The following methods of network expansion are possible:
- How to Add an AmpliFi HD MeshPoint to an AmpliFi Network (wireless)
- How to Add an AmpliFi HD Mesh Router or Instant Router to an AmpliFi Network (wireless)
- How to Add an AmpliFi Alien to an AmpliFi Alien Network (wireless)
- How to Add an AmpliFi HD Mesh Router, AmpliFi Instant Router or AmpliFi Alien to an AmpliFi Network via Ethernet Backhaul (wired)
- How to Add an AmpliFi HD Mesh Router, Instant Router or AmpliFi Alien in Bridge Mode (wired)
- How to Add an AmpliFi HD MeshPoint or Router to a Third Party Router's Network (wireless)
AmpliFi's web interface can be used on macOS and Windows to perform initial configuration of the network and manage advanced options. Other than that however, the AmpliFi system is meant to be managed from a smart phone or tablet. See how to perform initial setup on the web interface in the AmpliFi User Guide, Chapter 4: Installing Without the App. To read about the advanced settings configurable in the web user interface please see this article: Advanced Settings on the Web UI.
1. To access AmpliFi's web interface you must be connected to the AmpliFi network on your computer.
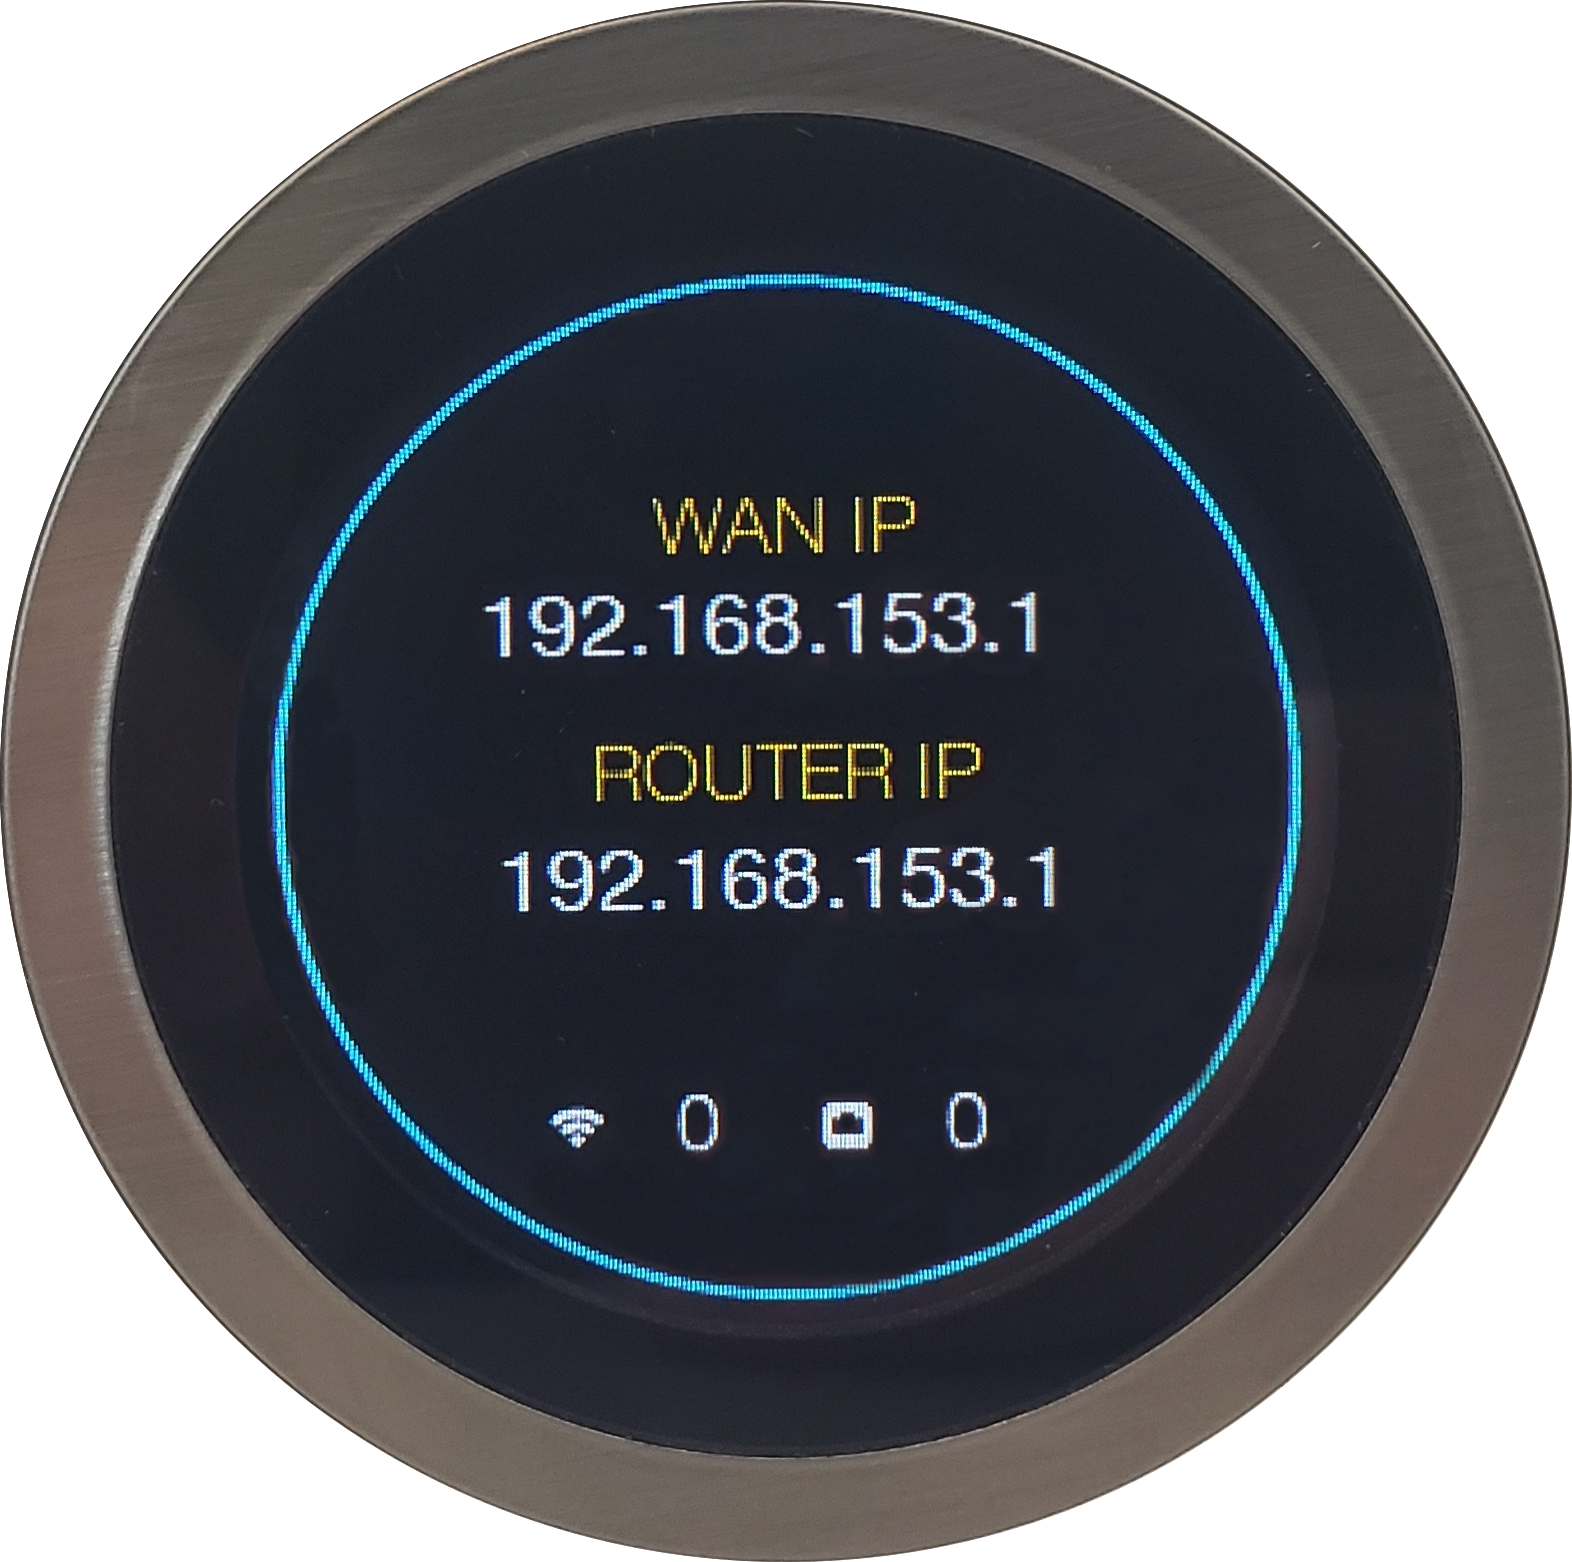
2. Open a web browser and in the URL type in the router IP address. The router IP address is visible on the router's LCD screen: just tap the screen until the correct one appears.
3. To log in, use your admin credentials: the same ones you would use to log into the AmpliFi mobile app.
AmpliFi will not replace your cable, DSL, or fiber modem. You need a modem to bridge the connection between your service providers internet service and your home router and devices. Note that AmpliFi provides the hardware, not the internet service. AmpliFi is also compatible with fiber optic services.
CONTACT YOUR ISP TO ENSURE THIS DEVICE IS COMPATIBLE WITH YOUR SERVICE.
Go to article page.
Yes, AmpliFi standalone devices (AmpliFi HD Mesh Router, AmpliFi Meshpoint HD and AmpliFi Instant Router) can be paired with a third party router. Other AmpliFi devices like the AmpliFi Alien Router, AmpliFi Alien Router and MeshPoint, AmpliFi Mesh Wi-Fi System, AmpliFi Gamer's Edition, and AmpliFi Instant can also be paired with a third party router as long as AmpliFi or the third party router is set to bridge mode. See our compatibility table to see how you can expand your AmpliFi network.
Go to article page.The AmpliFi Alien has one WiFi 5 chip for a 5Ghz radio and one WiFi 6 chip that broadcasts in 5Ghz and 2.4Ghz. The Alien supports 802.11ax/ac/n/g, which allows older devices to be perfectly compatible with this router. If you do not yet have WiFi 6 devices, the Alien will work well with your WiFi 5 devices and future-proof your home network.

The Alien product line is not "mesh-able" with our other product lines (HD, Gamer's Edition or Instant), since this would cause a degradation to the Alien and cause poor performance (see information on how to pair in third party mode below). We recommend using multiple Alien routers to create a WiFi 6 Mesh network. There is no limit to the number of Alien routers you can Mesh together. Please note that the Teleport hardware device is also not compatible with the Alien products, but the Teleport Router to Router or Teleport App VPN software will work perfectly with the Alien router.
Helpful links related to Alien:
- Website: More information on Alien, and selling points.
- Datasheet: Technical Specifications
- Quick Start Guide: "What's in the box" information, port location and other hardware physical characteristics.
- How to Edit the SSID Band: How to Create an SSID in a Specific 5GHz or 2.4GHz Range on Alien and other product lines.
- Which Device is Right for Me? Check compatibility of other product lines, ranges and coverage as well as other helpful links on how to expand your network.
- Alien + Standalone AmpliFi HD: You can add a standalone AmpliFi HD device (router or MeshPoint) to the Alien router's network in third party extender mode. We do not recommend this if it can be avoided since it will not fully integrate to the Alien, and there will be a loss of features. However it can be set up to extend the SSID and signal.
All AmpliFi devices are intended for indoor use. The operating environment temperature is between 14 to 131 degrees Fahrenheit (-10 to 55 degrees Celsius) and the operating humidity levels are between 5% and 95% non-condensing.
A normal range of internal device temperature for our devices is 140-165 degrees Fahrenheit.
Go to article page.Setting Up AmpliFi
Ethernet backhaul, also called wired backhaul or ethernet backbone, can be enabled to create a direct connection from the AmpliFi router to a secondary AmpliFi router, otherwise known as a RAMP (Router as a Mesh Point) instead of connecting them wirelessly. Both routers will broadcast the same Wi-Fi (SSID) and all devices will be on the same network, regardless of location.
Note The HD, Instant and Gamer models are compatible among themselves; but the Alien devices are only compatible with the Alien line. Only standalone routers can be added as a RAMP to an AmpliFi mesh network. Please refer to the Compatibility Guide for details on possible ways to extend your network and a list of standalone devices. And to this article for other methods to extend your network: Adding Standalone Devices as Mesh Points.
To enable the Ethernet Backhaul feature please do the following:
1. Connect to the Wi-Fi network your AmpliFi router is broadcasting and launch the AmpliFi mobile app.
2. Power on the standalone mesh router and wait for it to power on.
3. In the System / Overview page of the app, wait for the "Adopt to a mesh" pairing message to appear. Follow these setup steps to first wirelessly connect the standalone unit to the main router. Even if you will later connect them via cable, it is important to begin with both routers next to each other, pair them wirelessly, and once the process is complete, you can connect them by cable in step 5.
4. Once the mesh router has been wirelessly paired, go to the app's System / Overview page and tap on the newly paired mesh router's icon to open its settings.
5. Toggle on the "Ethernet Backbone" option.
6. Save settings by tapping the check mark at the top right corner of the mobile screen. Once the settings have been saved, allow the router a moment to apply the new settings.
7. The RAMP will now say "connecting..." on its LCD screen. Plug in the Ethernet cable to the WAN port and the RAMP will recognize the cable connected. Once this is done, you may disconnect the routers from power to set them up in their final location, the configuration will not be lost if it was successful.
Note You must have the RAMP wired to the AmpliFi router directly. This means you cannot have them both connected to a modem/router in the back bone configuration, the RAMP must have a direct connection to the AmpliFi. You can use a switch as long as it is fed by the AmpliFi router. For example modem > AmpliFi router > switch > RAMP will work.
Go to article page.The admin password is needed to access and manage AmpliFi on the mobile app, as well as the web controller. By default, this password and the Wi-Fi password are the same, but both can be modified. By having two different passwords, your family will have the wireless password without having access to the management app.
To learn how to change the Wi-Fi password, see this article. For editing the guest network please see this article. To change the administration password of the AmpliFi router please perform the following steps:
1. Launch the AmpliFi app.
2. Select the AmpliFi router icon.
3. Tap General.
4. Scroll down to the Actions section and tap Change password.
5. Input new password, tap show password to preview. Tap ✓ to save your settings.
Go to article page.
By default the AmpliFi Wi-Fi and administrator passwords are the same, however both can be changed to be different. This way your family can have the wireless password without having the password to the management app. Info on how to change the admin password (for the mobile and web apps) can be found in this article. For editing the guest network please see this article. To change the Wi-Fi network (SSID) name and/or password, follow these steps:
1. Launch the AmpliFi app.
2. Select the AmpliFi router icon.
3. Tap Wireless.
4. Under Wireless Settings you can change the Wireless SSID Name, which is the name that devices wanting to connect to your network will see. You can also change the Wireless Password, which is the password those devices will have to provide in order to connect to your network.
5. Tap ✓ to save your settings.
Go to article page.
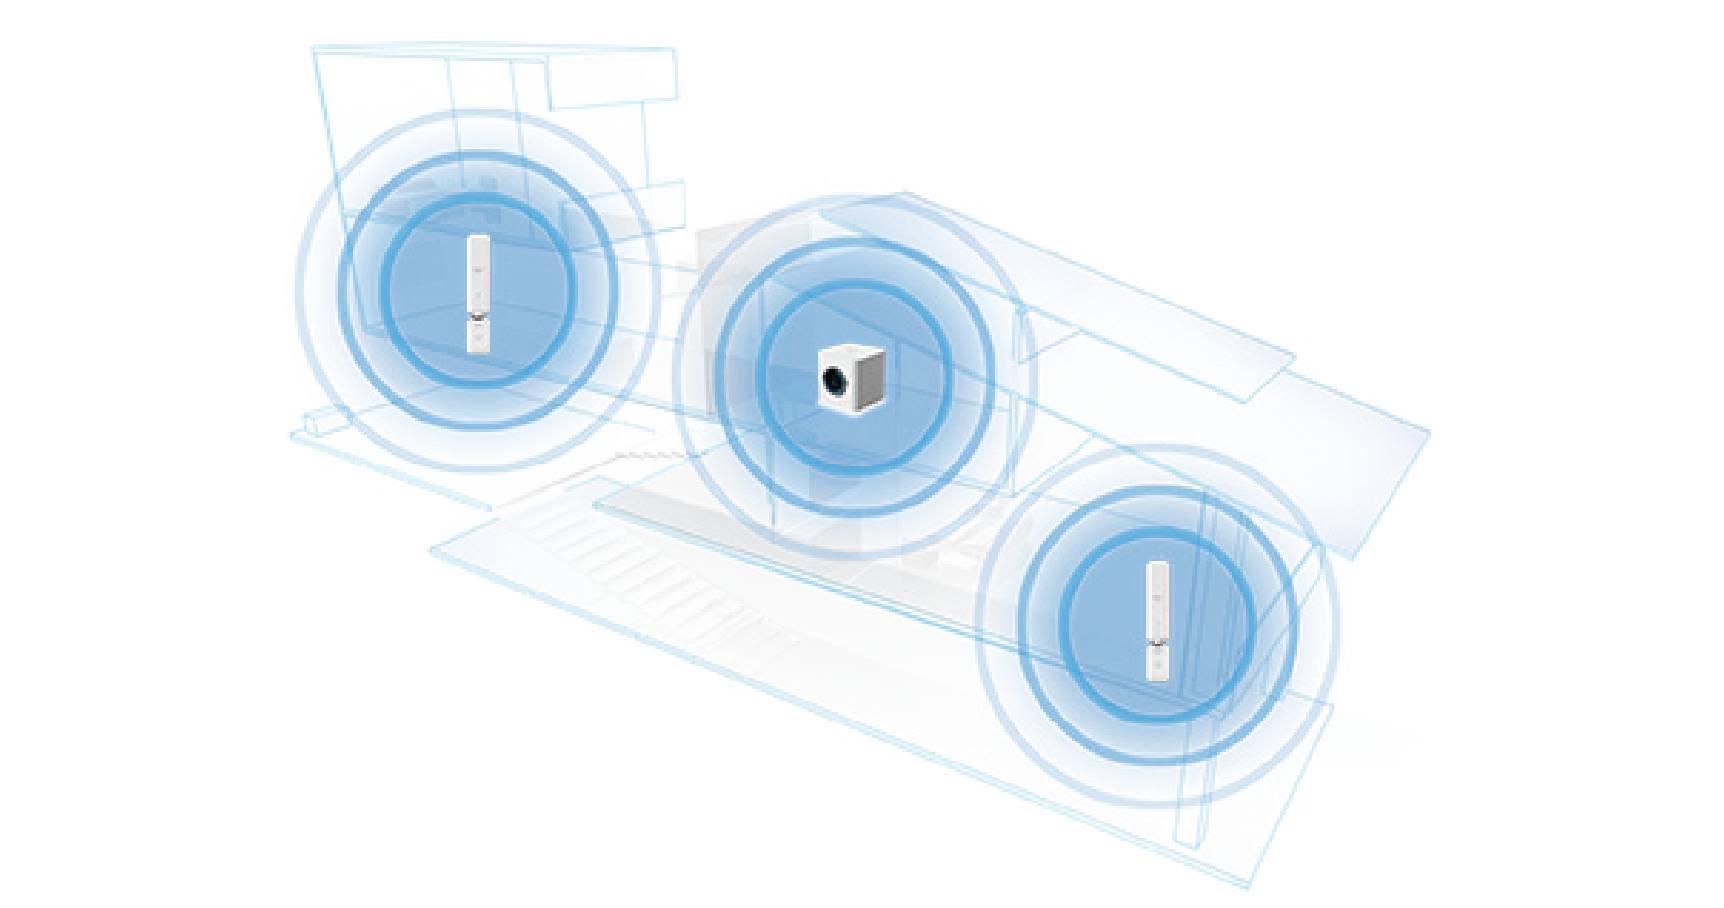
Device placement will vary depending on a number of factors. You can use the LEDs on the HD MeshPoints to guide you as you move them around to find the optimal coverage. You can also adjust the mesh point's angle to get better signal.
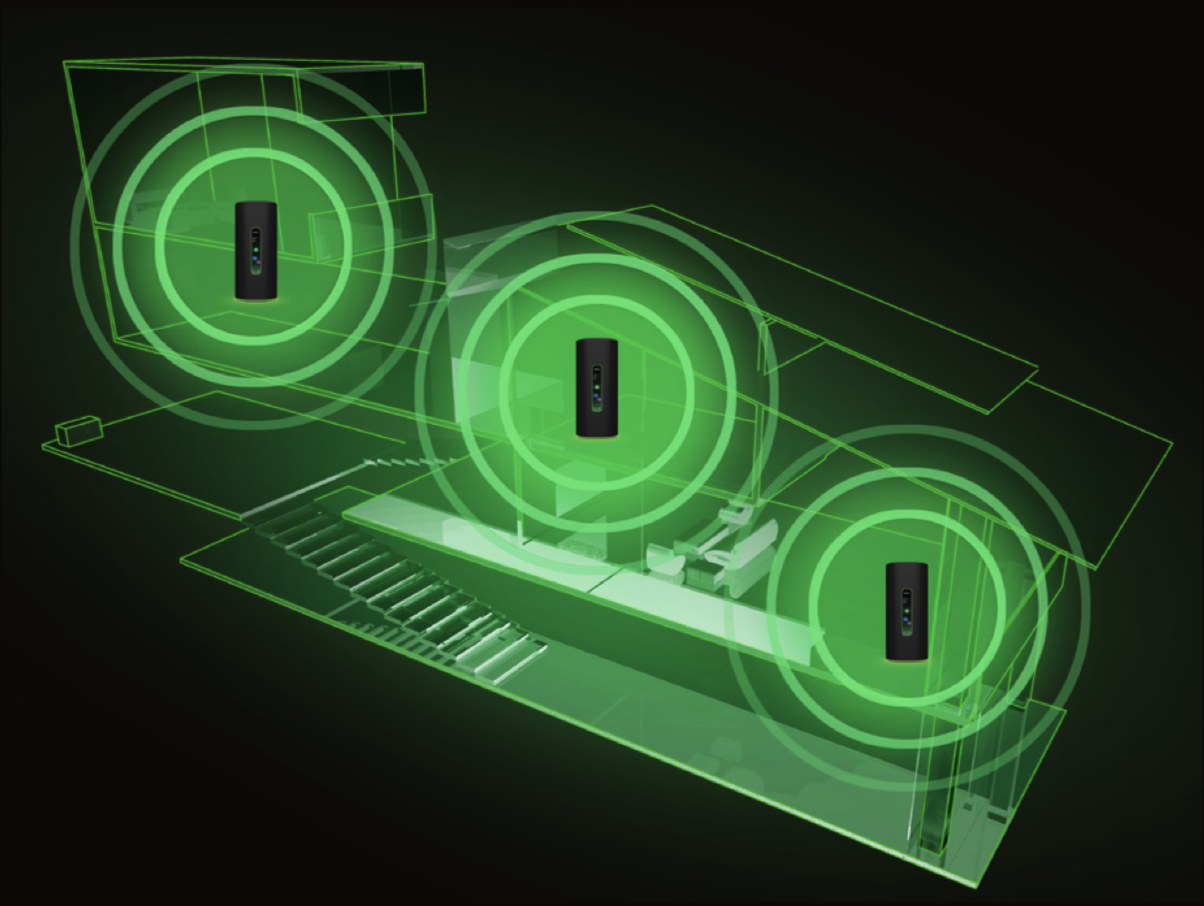
For best performance, place the AmpliFi router at the center of the home or as close to the center as possible. It is recommended to place an AmpliFi mesh point on each side of the router, halfway between the AmpliFi router and an area in the home where there is poor connectivity.
AmpliFi HD
AmpliFi Alien
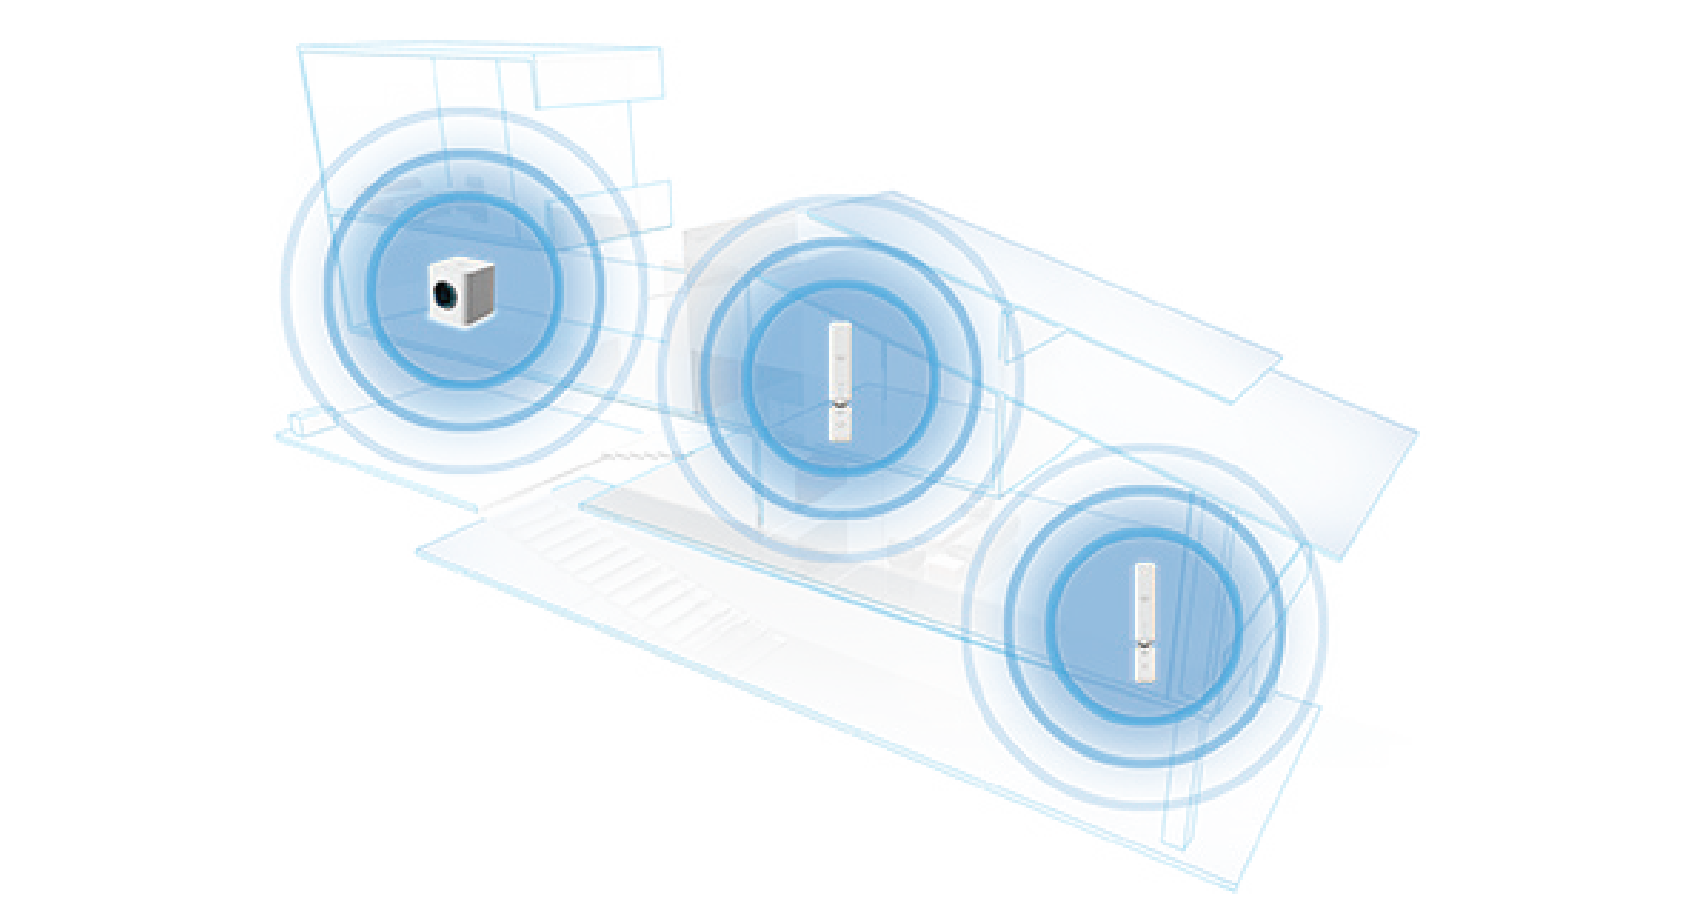
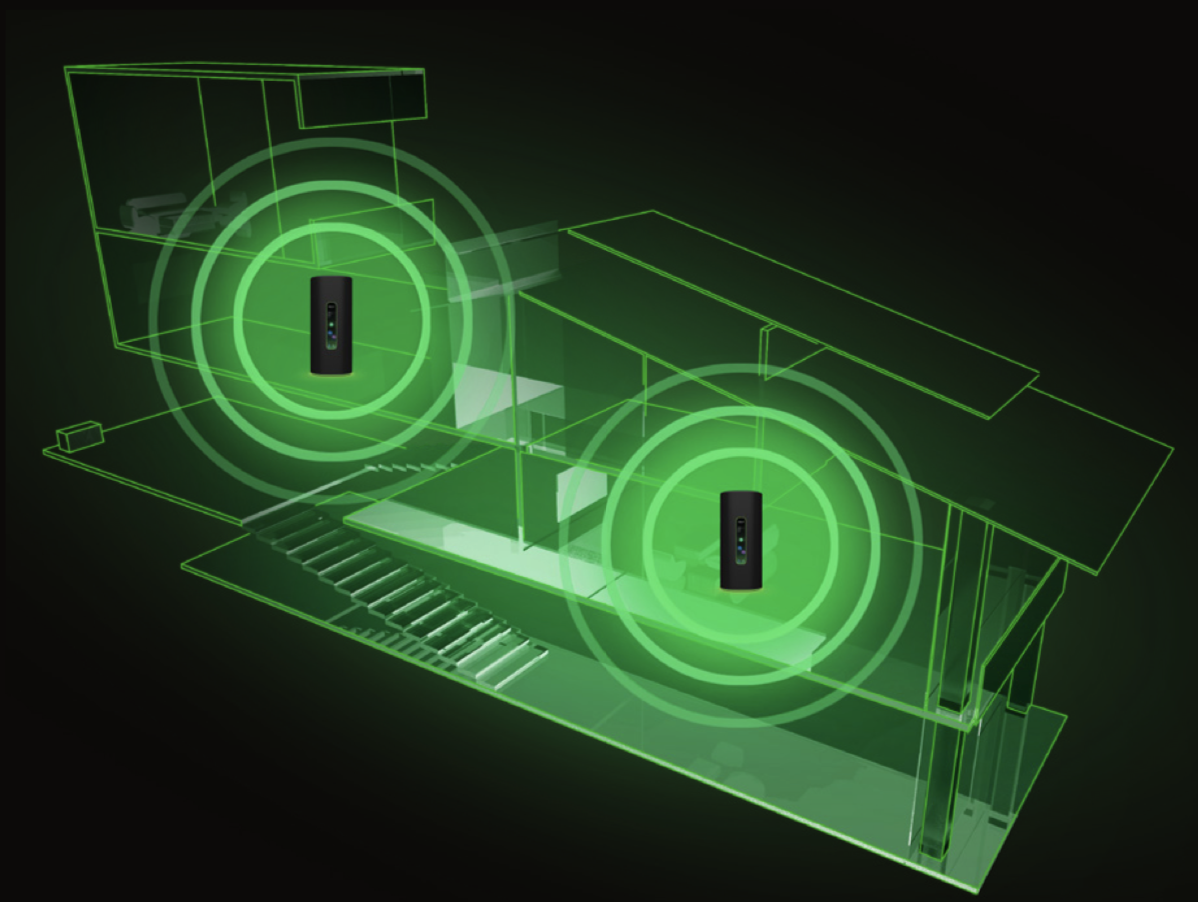
If placing the AmpliFi router near the center of the home is not possible, "daisy chaining" is the next best solution. That means that the signal will jump from one mesh point to the next.
AmpliFi HD
AmpliFi Alien
Once placed, if the signal is not ideal, move the mesh points around a bit, trying to keep the face of the mesh point toward the router for best reception. Observe the mesh points' LEDs to verify where they are receiving the best signal. All networks will be different, but you can use the following tips as a guide to get you started:
- The MeshPoints have five LEDs that display the current signal level. Five lit LEDs indicate 100% signal level. You should have at least 80% signal, or four LEDs. See other LED statuses in this article. Routers you may be using as mesh points (RAMPs) will show their signal strength on their LCD screen (you should strive to have GREAT signal). If you prefer to see more precise percentage levels you can use the app: tap on the mesh point device (either MeshPoint or Router as a Mesh Point) and then see the signal level displayed.
- Place the MeshPoints at least 25 feet away from each other. For the best result we would suggest to place the mesh point 60-70 feet from the router.
- Depending on what your main goal is, you might want to change the band on which the mesh point is operating. Follow the steps in this article to change this setting.
- For maximum coverage the MeshPoint's backhaul needs to be set at 2.4GHz.
- For higher speeds, the 5GHz is recommended.
Note Click on the images to see animation of the LED patterns.
|
Initial configuration state: When the AmpliFi router is not configured (not paired), the router LED will be lit at the maximum brightness setting, and the 3 middle LEDs of the MeshPoints will flash. |
|
|
|
Initial configuration in progress: While you are configuring your router, its LED will flash slowly, and all the LEDs of the MeshPoints will flash. |
|
|
|
Bootup state: The router LED will be lit at the minimum brightness setting. The bottom LED of the MeshPoints will be lit for 15-20 seconds, and then the LEDs will light up in sequence from bottom to top for 10-15 seconds. |
|
|
|
Wi-Fi not ready or connected: The router LED will be lit at the minimum brightness setting. The LEDs of the MeshPoints will light up in sequence from the middle outwards. |
|
|
|
Ready state: The router LED will be lit solid white at the maximum setting or at the brightness level you choose in the AmpliFi app. The MeshPoints will be lit based on the signal strength that they are receiving from the router. |
|
|
|
Locate state: If you use the Locate feature in the AmpliFi app, the router LED will flash quickly, and all of the MeshPoints' LEDs will also flash quickly. |
|
|
|
Upgrading state: While the AmpliFi router is being upgraded, the router LED will increase in brightness and the MeshPoints’ LEDs will light up one by one. |
|
|


Go to article page.
This is a quick reference guide explaining the LCD screen options found on the AmpliFi HD router. All router screens can be turned off and their brightness adjusted, see this article for more.
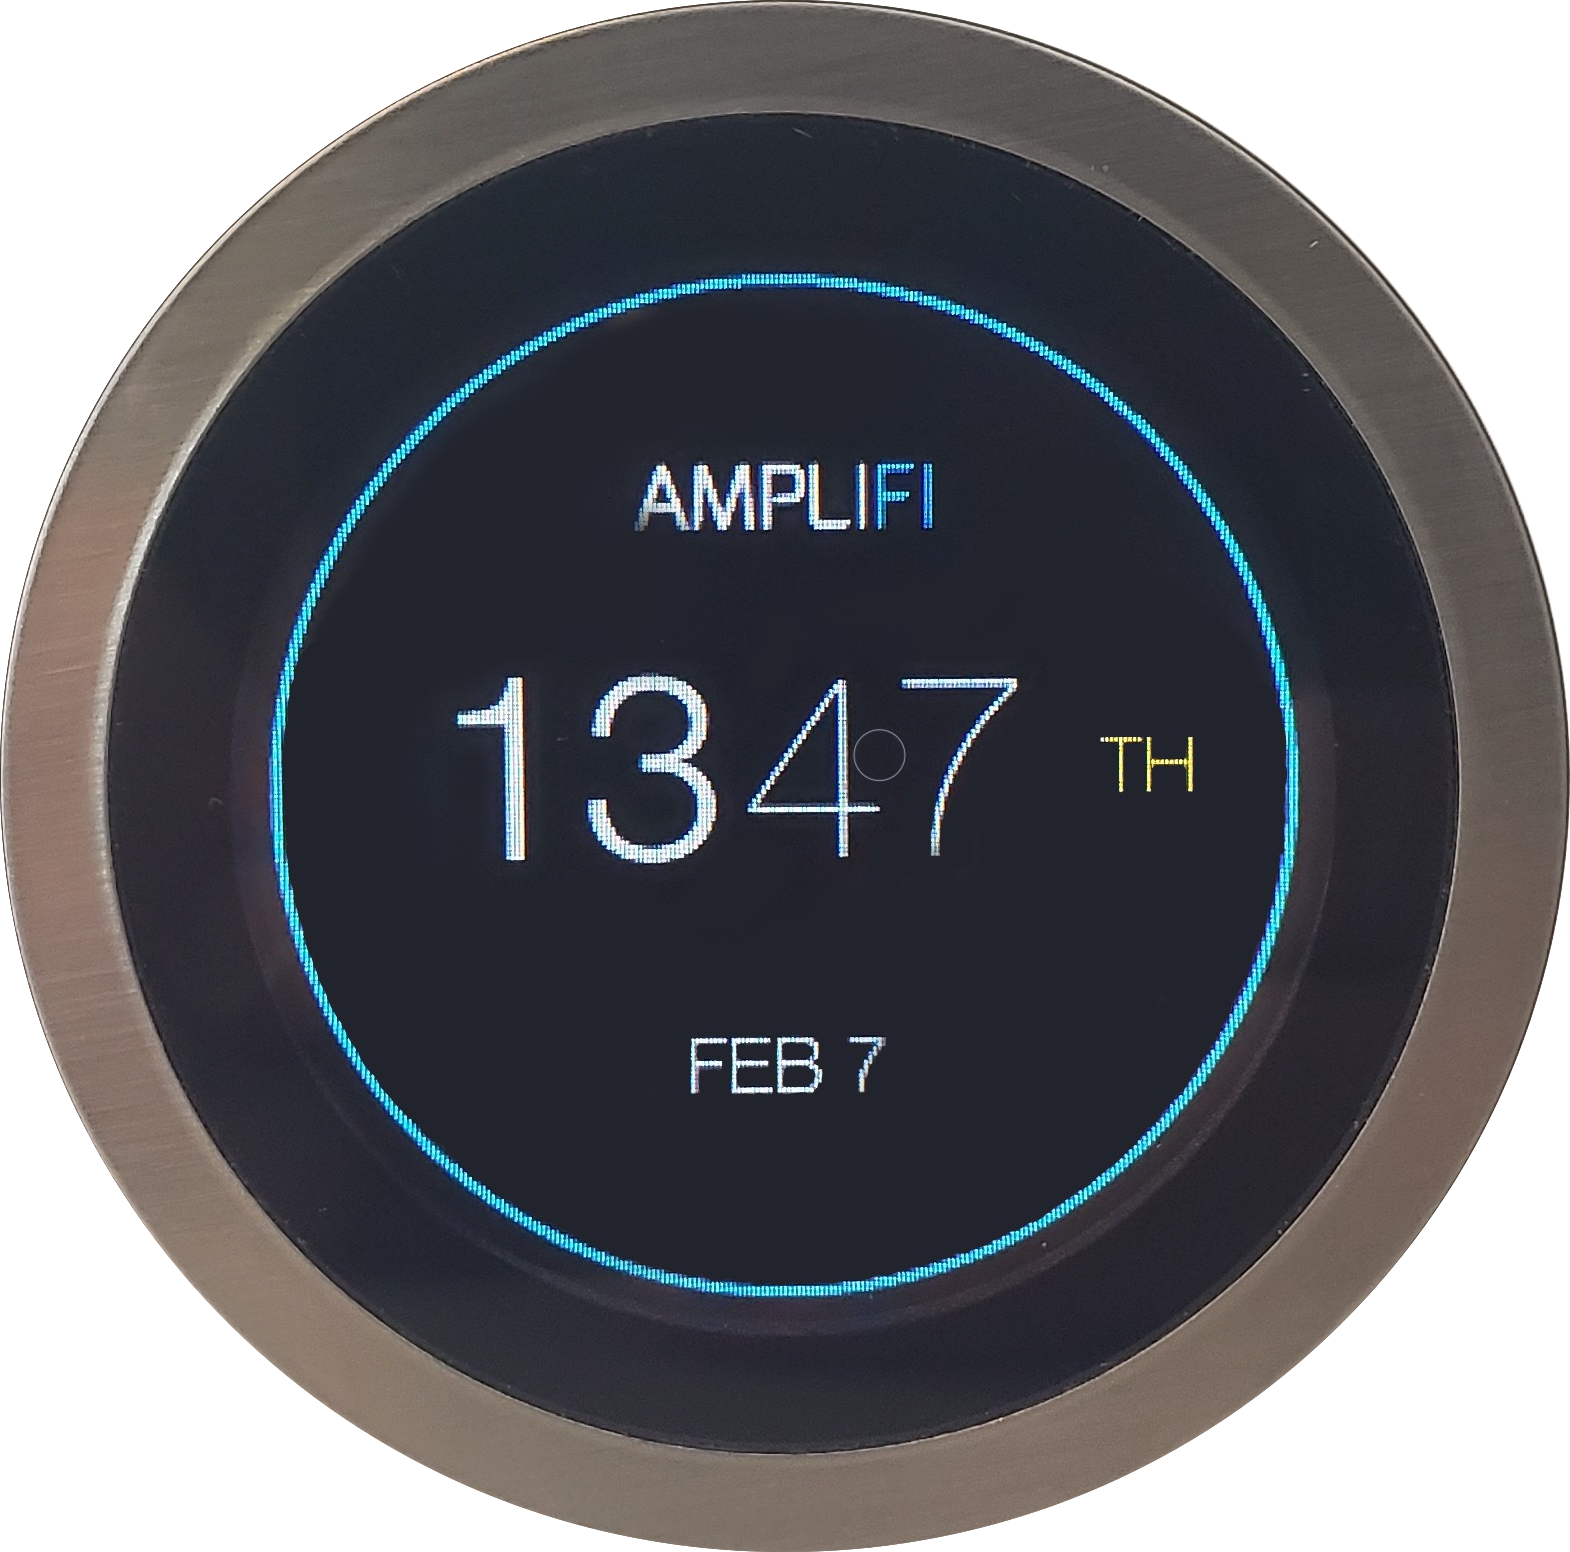
Main
The main screen on the LCD display will have the time and date. You can choose between 12h and 24h mode in the app by launching the AmpliFi app, and selecting the router icon to access its Settings. Then navigate to General > 24-Hour Time.
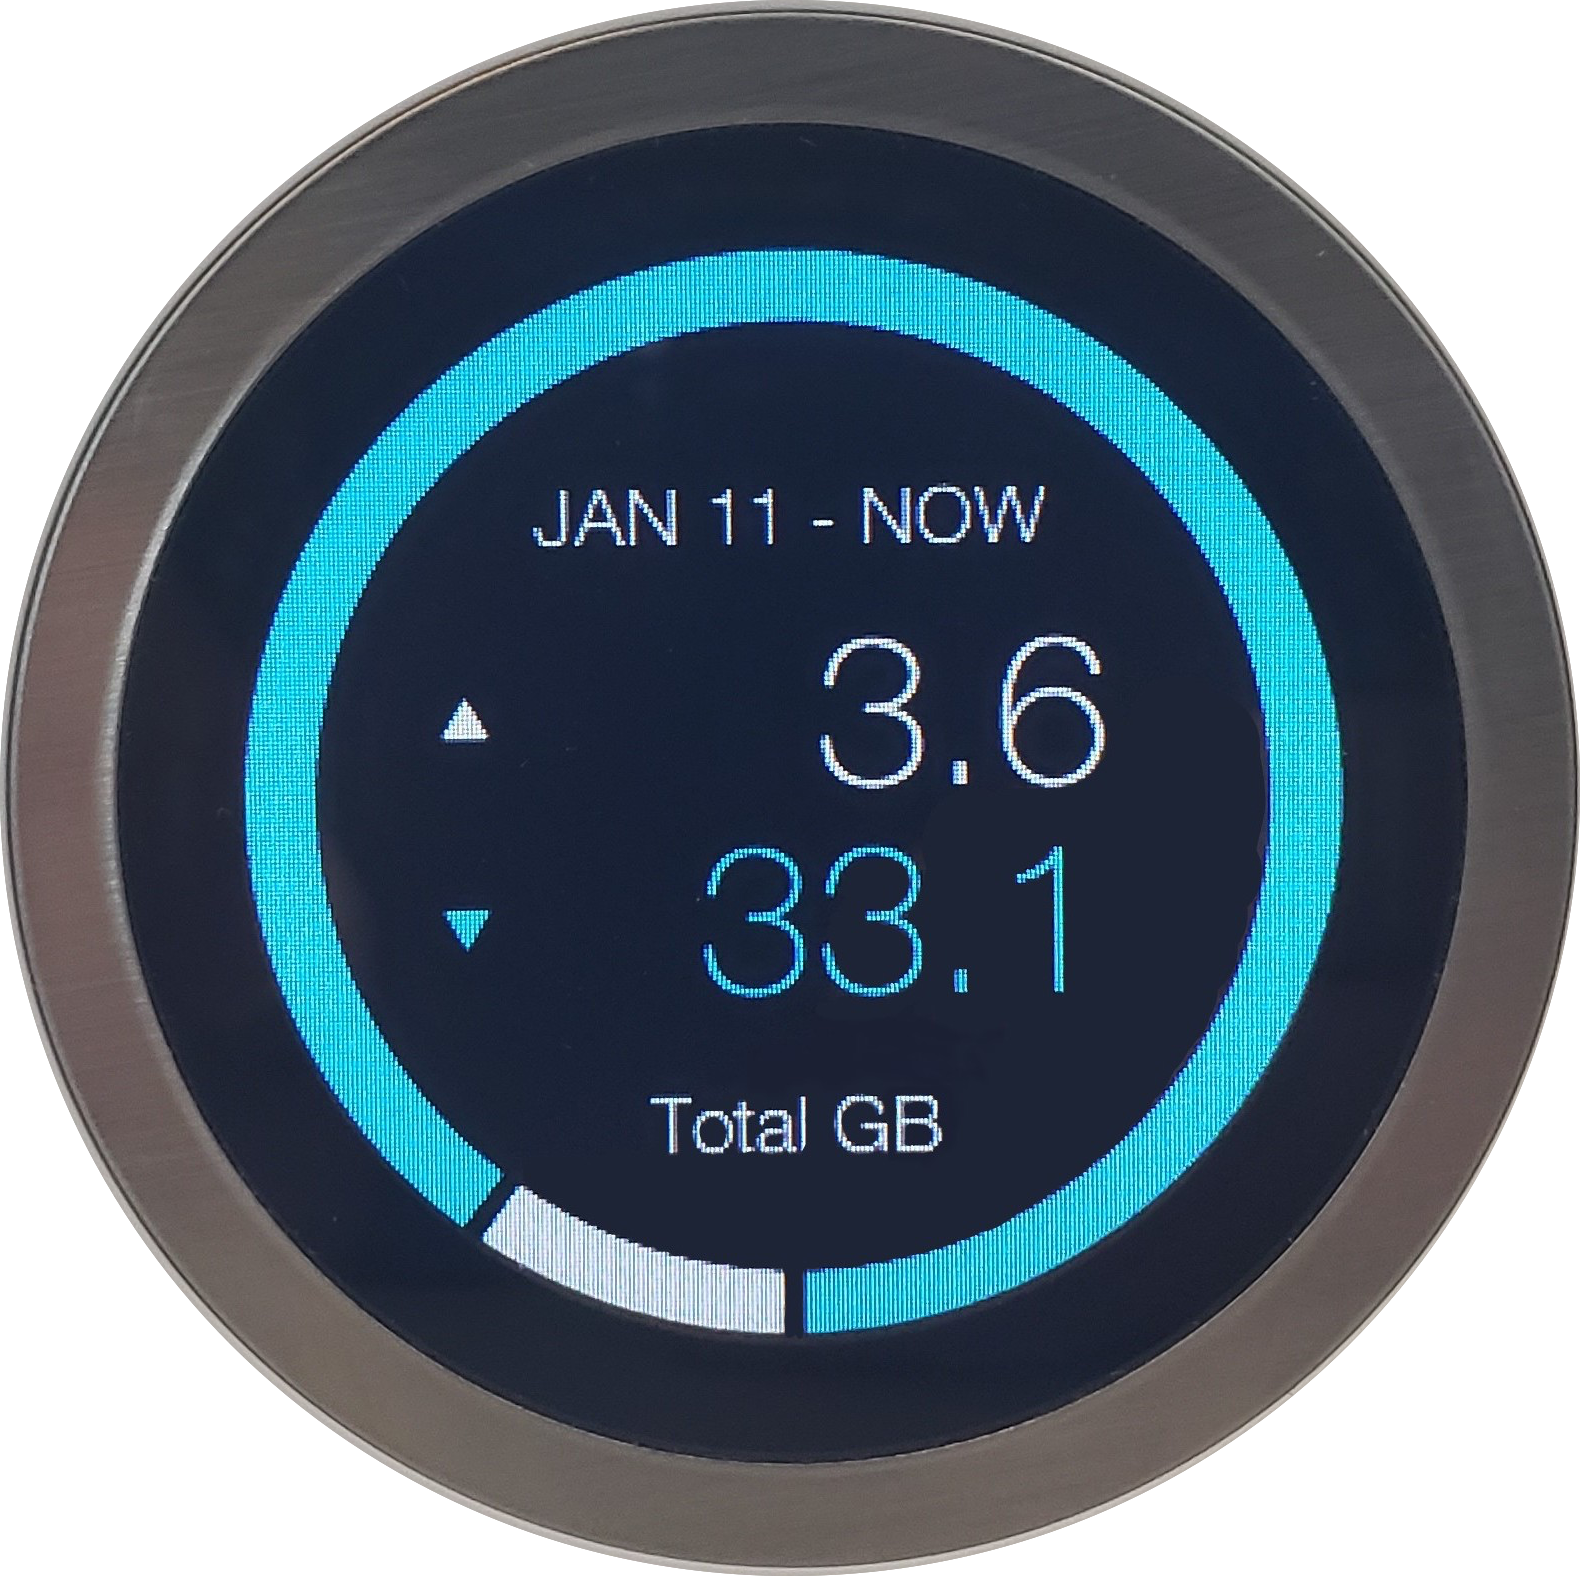
Total Network Usage
AmpliFi will display the total upload and download on the entire network for a specific date range. The date range can be reset in the application, instructions on how to do so can be found here.
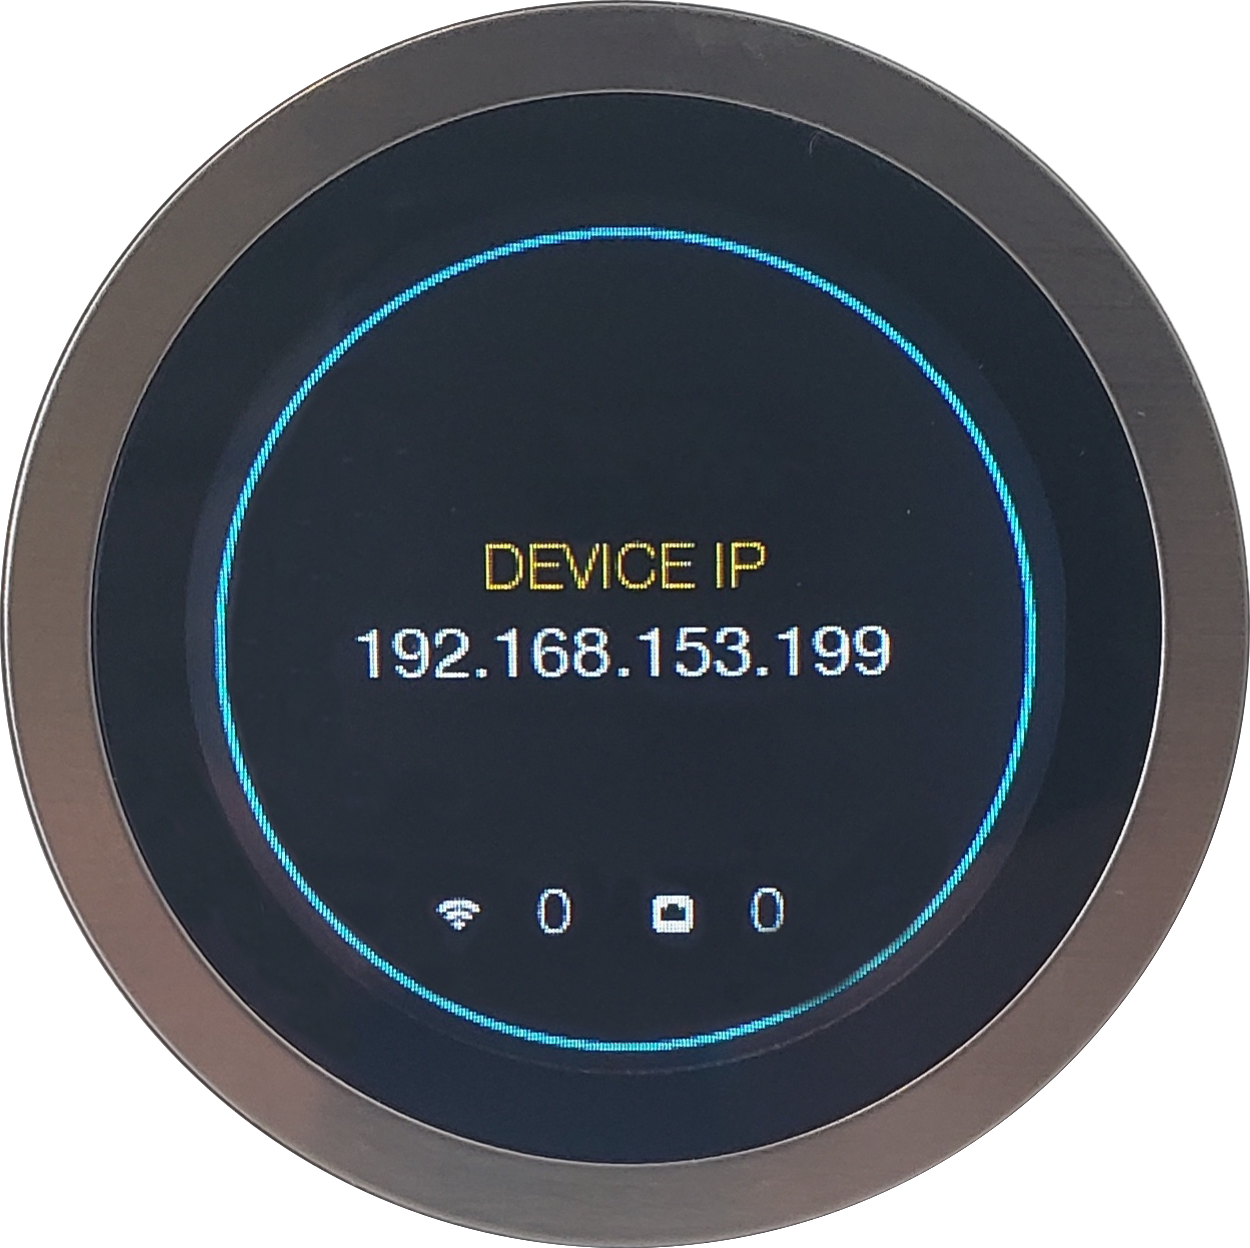
IP Address
WAN IP will be the public IP address, or the IP address of the gateway if AmpliFi is configured to be in bridge mode.

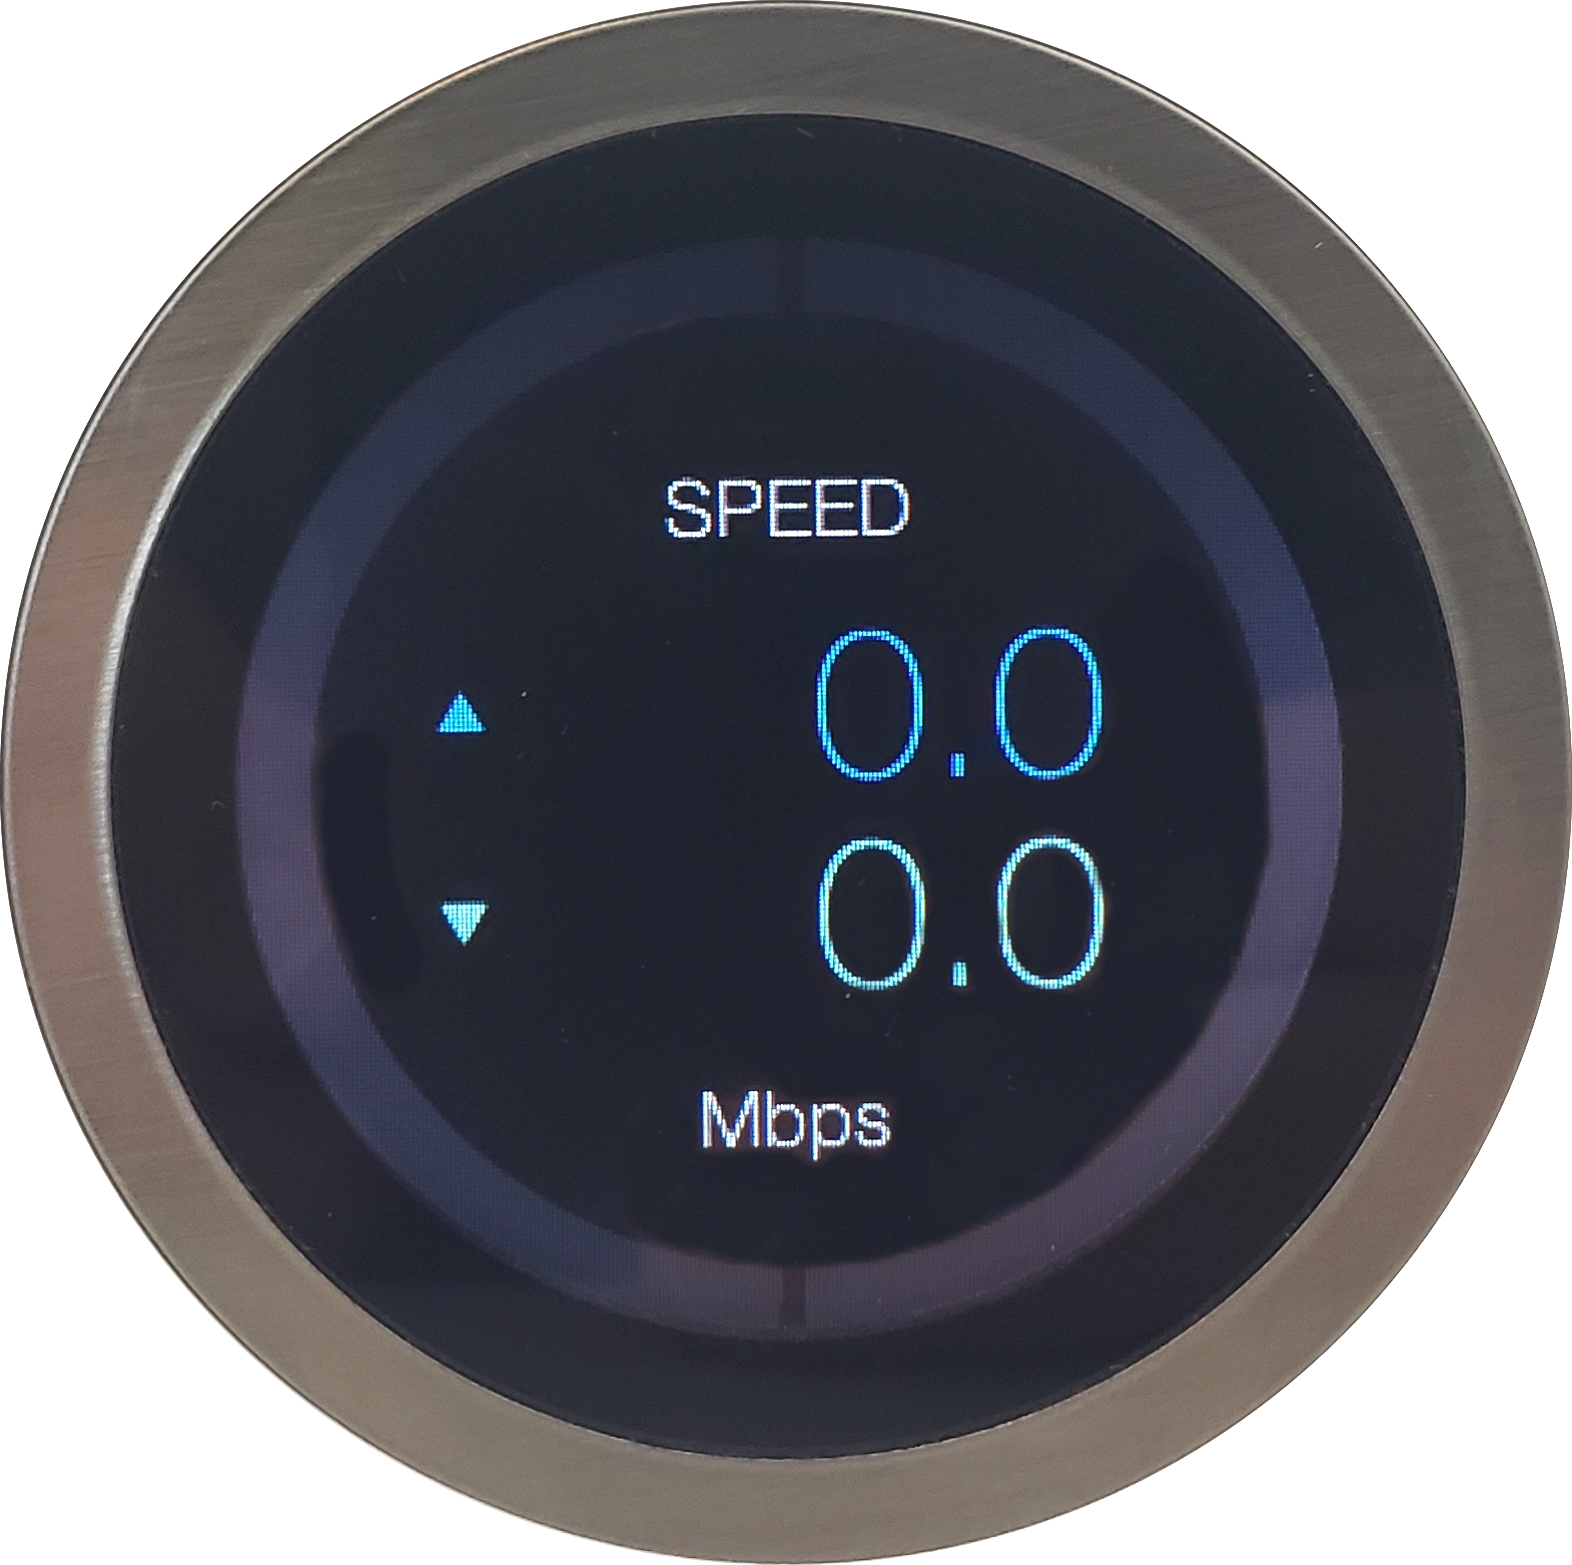
Speed
This screen provides information on the network's current upload and download speed. It is common to see 0.0 on this screen if there are no devices on the network currently uploading/downloading data.
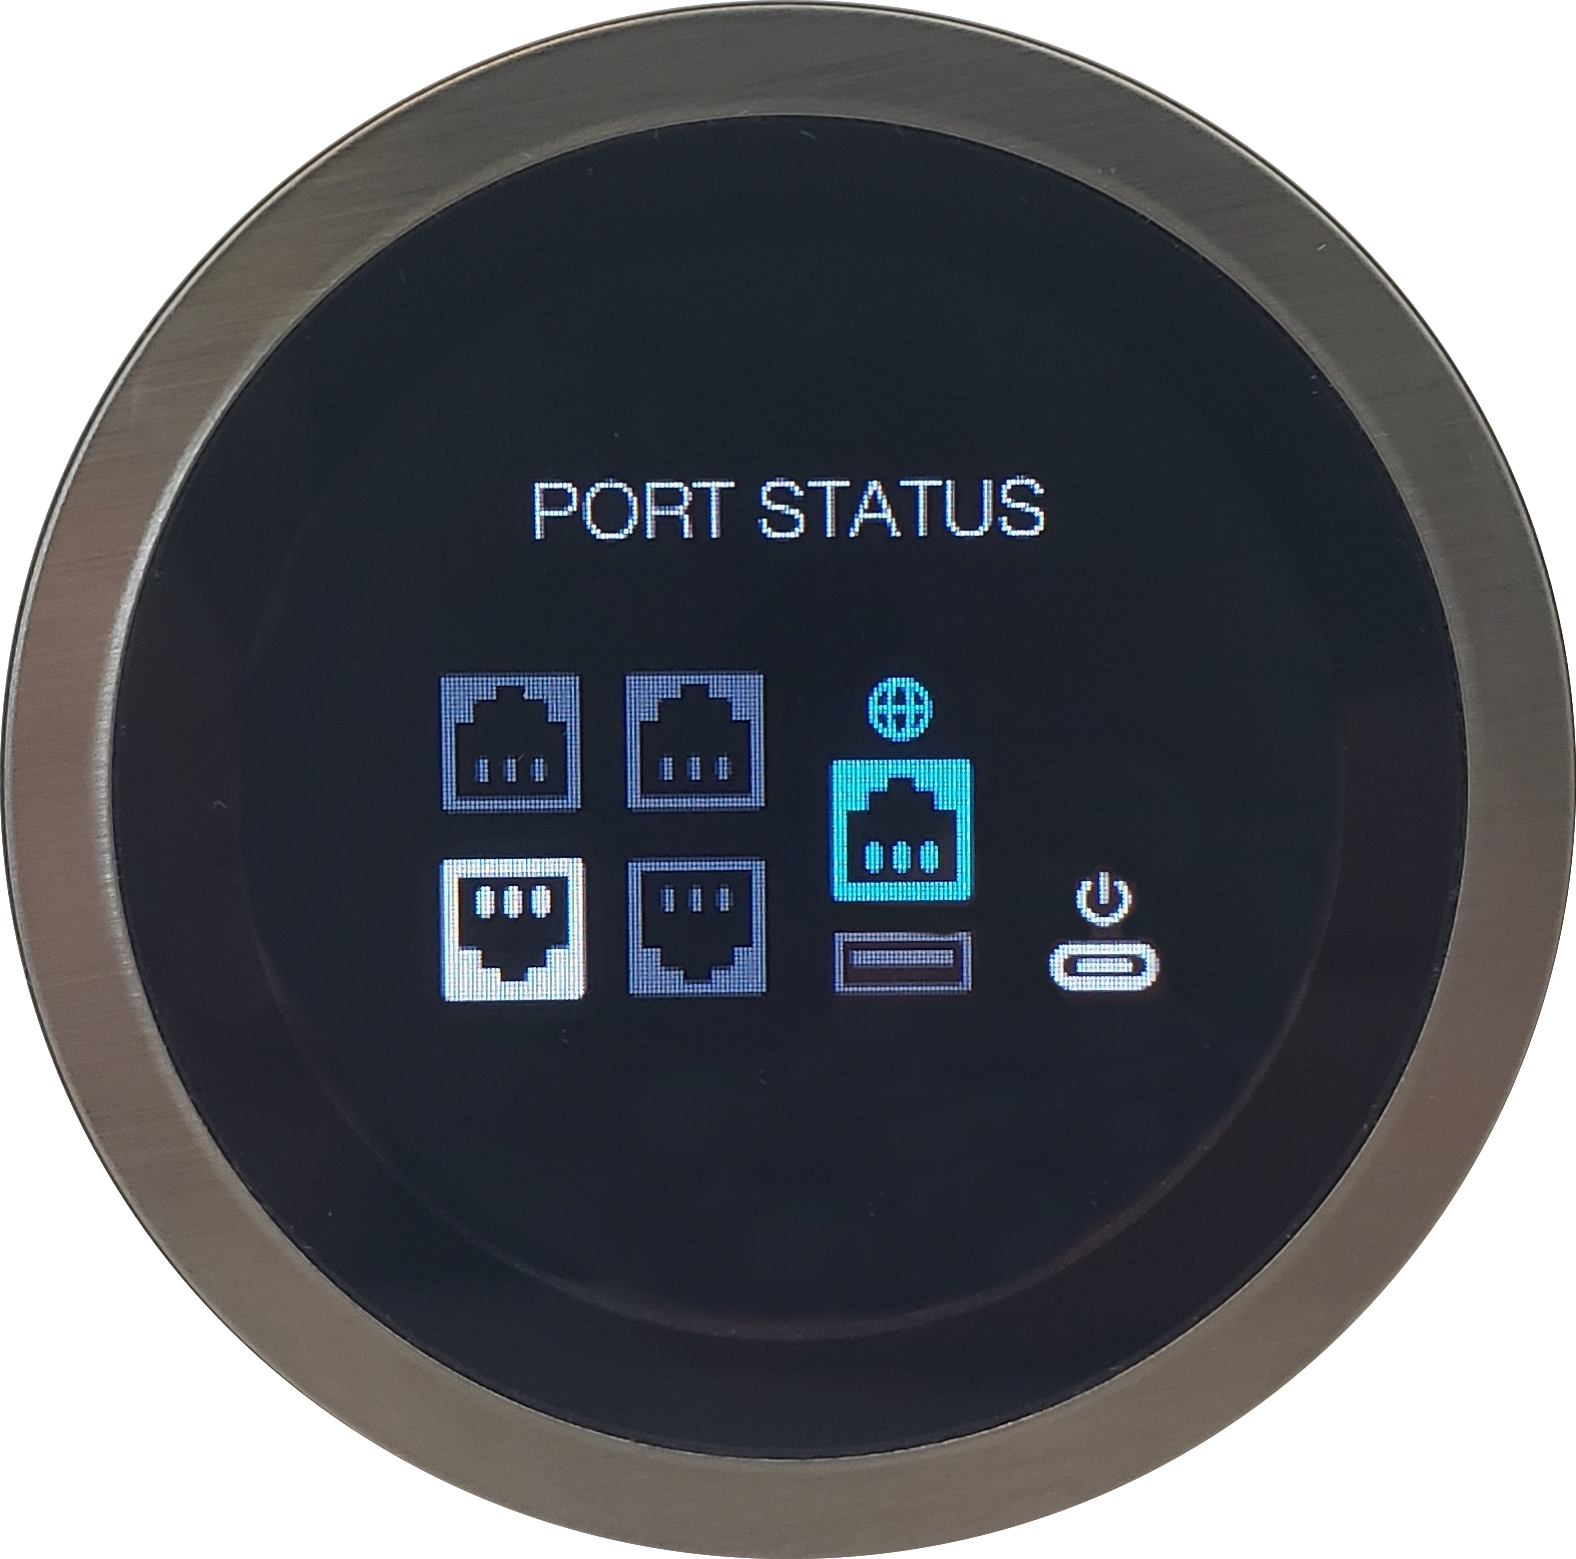
Port Status
Each Ethernet port on AmpliFi will be displayed here. Highlighted means the port is active, whereas grayed-out means nothing is currently plugged into that port.
If you are using a router as a mesh point, you will have two additional screens. The first will be the mesh point's IP address, and the other is the mesh point's signal quality.

Customizing AmpliFi
All client devices connected to your AmpliFi network can be viewed and managed in the Devices tab found in the mobile app. Devices are automatically identified based on the first 6 characters of their MAC ID, known as the OUI (Organizational Unique Identifier). Devices will first appear with generic names and WiFi icon ![]() if they cannot be identified by their OUI, until you customize them.
if they cannot be identified by their OUI, until you customize them.
To customize a device name and icon follow these steps:
Changing icons through the mobile app
1. Tap Devices.
2. Select the device you wish to update.
3. To modify the device name, tap the current device name in the Client Details section.
To modify the device icon, tap "Change Icon".
4. You can search for specific icons by name, or you can browse all device icons by manufacturer.
5. The changes you made will now be displayed on the list of connected devices, as well as in the web interface.
Changing icons through the web interface
1. First, log in to AmpliFi's web interface, and select "System Info" in the top right corner. 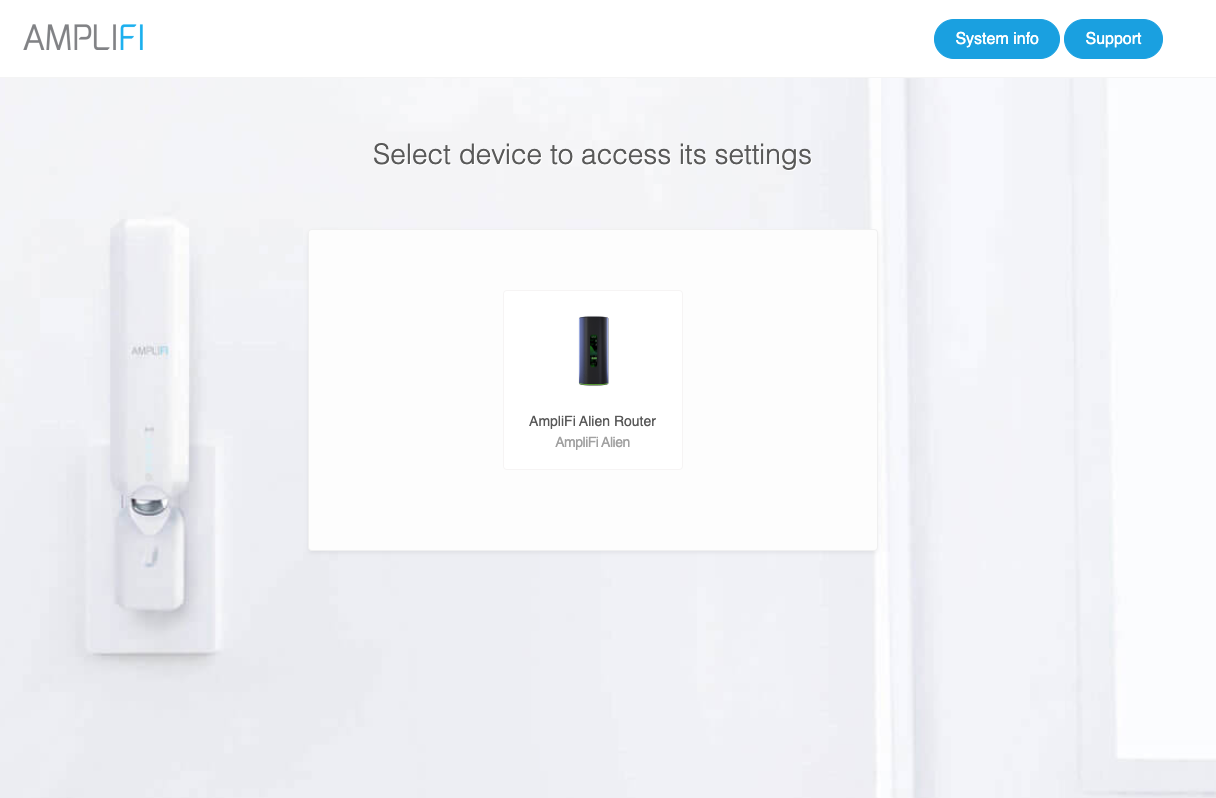
2. Select the device you wish to modify.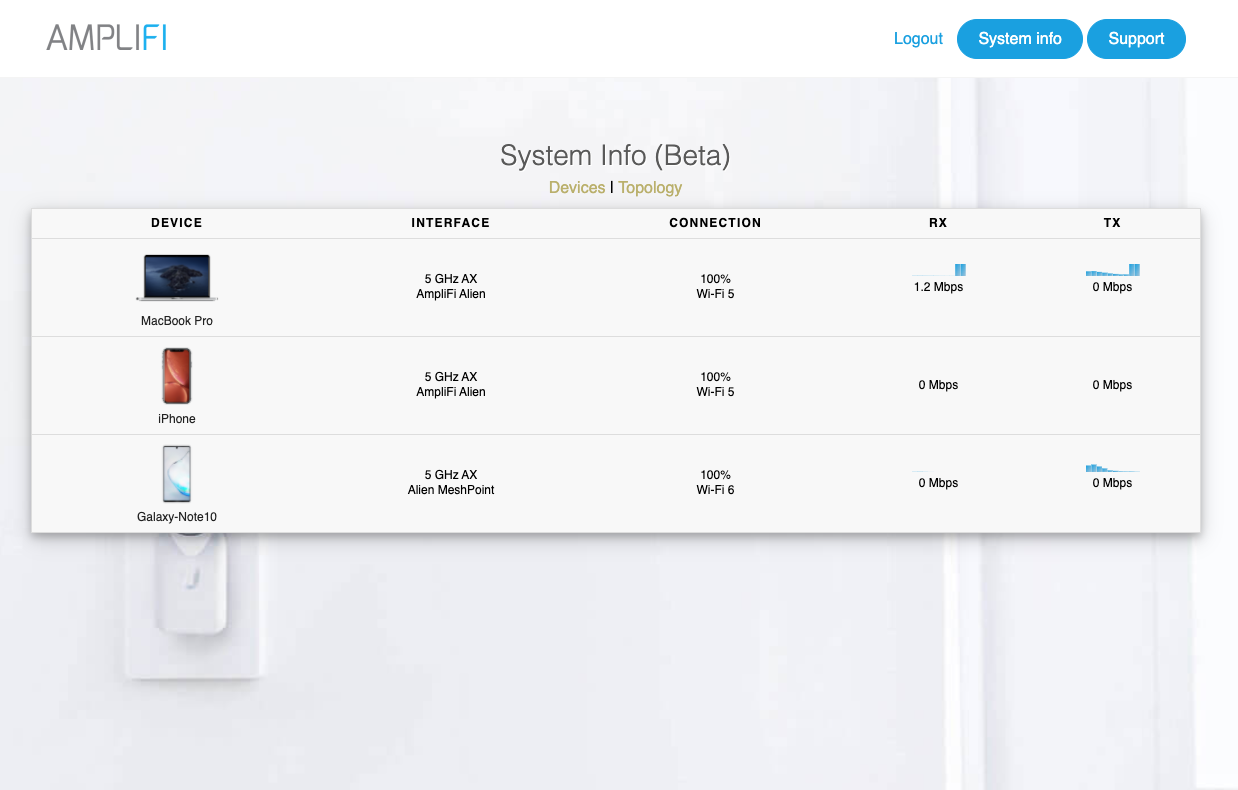
3. Clicking on the device name highlighted in BLUE will open a text box for you to modify the name. Select the "Change Icon" option underneath the device logo to change your device's image.
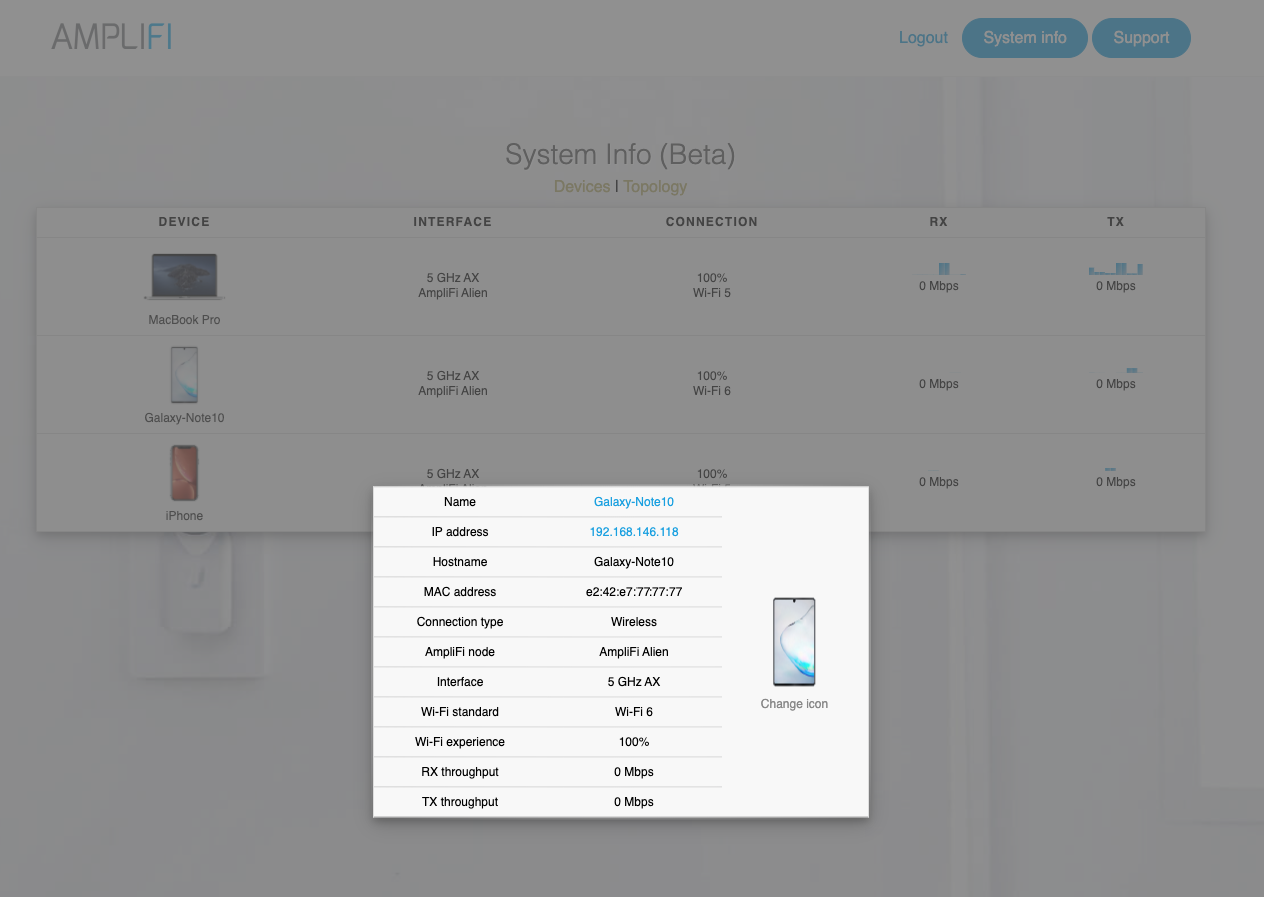
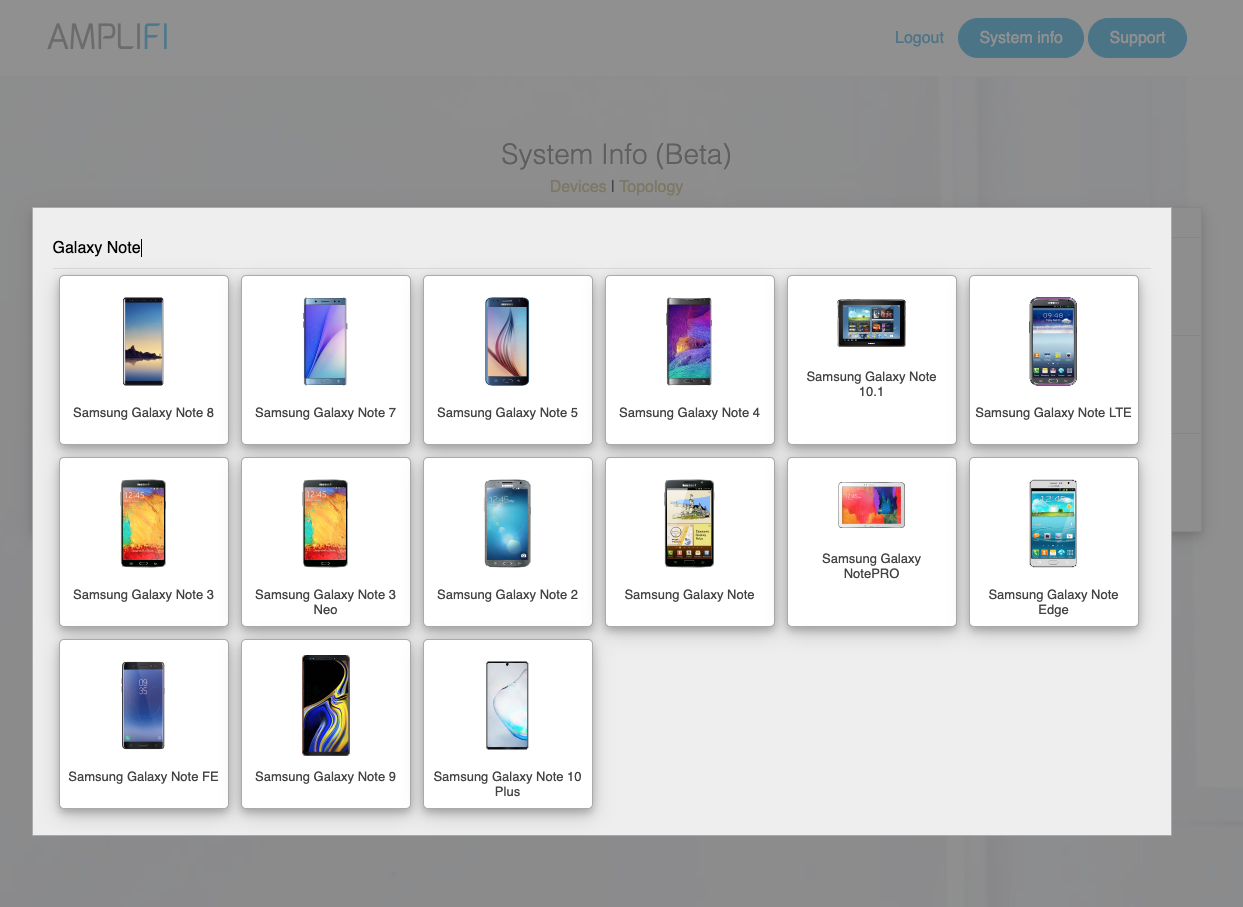
4. Search by keywords or with the device's specific name. Updating the device icon and name on the web interface in this way will also update your device's information on the mobile app.
Go to article page.
AmpliFi's different product lines allow for network expandability by adding standalone devices: MeshPoints or routers. Routers can be added wirelessly or via ethernet backhaul (see instructions below). There is virtually no limit to the amount of standalone units that can be added as access points to the AmpliFi network, but there are two restrictions to keep in mind:
- Devices that came bundled together in a box are hard-coded to each other and cannot be used to expand another network. You can however, add standalone devices to expand a kit. Need help determining if a device is standalone? See this article: How to Verify if a Device is Standalone.
- The Alien line is only compatible with Alien products. AmpliFi HD, AmpliFi Instant and AmpliFi Gamer's Edition are compatible with each other but not with the Alien line. For more information, see this Compatibility matrix.
- How to Add an AmpliFi HD MeshPoint to an AmpliFi Network
- How to Add an AmpliFi HD standalone router or Instant standalone router to an AmpliFi Network
- How to Add an AmpliFi HD MeshPoint or Router to a Third Party Router's Network
Add an AmpliFi Router or MeshPoint to an existing AmpliFi Network
Ensure the MeshPoint you wish to add is plugged in and powered on: the three middle LED lights on the AmpliFi HD MeshPoint should be flashing. The LCD of the AmpliFi device should be showing ready for setup.
Option 1: Launch the AmpliFi app, and select Adopt to a router to add the MeshPoint to the app that has discovered it. Note it may take up to two minutes to fully adopt a new device.
Option 2: Alternatively you can manually add the router or a MeshPoint using the AmpliFi router's LCD screen. When prompted, select Add to Mesh and wait for adoption to complete.
Add an AmpliFi HD AmpliFi Network
This process will show how to add a standalone router wirelessly. To learn how to configure a router as a mesh point (RAMP) via a wired connection (ethernet backhaul), see this article: How to Enable Ethernet Wired Backhaul . Both the HD and Instant models are added using the same method described in this section.
Ensure that the router is plugged in and displaying the screen shown below. This will mean it is ready for adoption.
How to Add an AmpliFi Router or AmpliFi HD MeshPoint to a Third Party Router's Network
The standalone AmpliFi HD Router and MeshPoint can be set up as an access point with a 3rd party router by following this procedure:
Note To add the AmpliFi router in bridge mode instead of a network extender, please refer to this article. The Alien product line does not support third party mode.
Plug in your AmpliFi router or MeshPoint. The MeshPoint will have the 3 middle LEDs flashing, indicating that the MeshPoint is ready to be added.
Setup can be performed using the AmpliFi app or by connecting to the wireless 'setup network' on a computer or mobile device.
Setup using the AmpliFi app
1. Launch the AmpliFi app.
2. Tap on the plus sign in the top right corner.
3. Select Set Up Independent AmpliFi Mesh Point.
4. Select the standalone router or mesh point to be set up.
5. Follow the setup wizard steps.
Setup through the setup network
1. Connect to the MeshPoint's setup network, it should have the model name of the device and several letters and numbers after.
2. A setup window will pop up, select the network that the MeshPoint will extend (the local network).
3. Enter the password for the network you selected.
4. The MeshPoint will then connect to the selected network.
Go to article page.
The SSID (Service Set Identifier) is the wireless network's name. It is the name you see when you select your Wi-Fi from a wireless network list on a client device, like a laptop or mobile phone. AmpliFi allows you to configure several elements of your network's SSID: Its name, password and the band (2.4GHz or 5GHz). You also have the option to create a new SSID with different characteristics to suit your needs. Our different product lines will have different options for configuration.
For AmpliFi Alien, please continue reading to the next section. If you wish to configure the AmpliFi HD, AmpliFi Instant and AmpliFi Gamer's Edition , please skip to this section.
AmpliFi Alien
The AmpliFi Alien has multiple SSID broadcast options to provide the best possible configuration for your home environment.
Common SSID Name
By default, AmpliFi Alien has WiFi-6 enabled in the primary SSID. If you would like to separate the 2.4GHz and 5GHz bands into individual networks, you can do so by disabling Common SSID Name. An example of when you would want to disable the Common SSID Name would be when you want to prevent your devices from roaming between the 5GHz and 2.4GHz networks. By disabling this feature and connecting your device to your desired network, you make sure they do not move from that band.
Note: This is a global feature, and will be applied to the router and all mesh points on your network.
Additional SSID
This setting will broadcast an additional SSID for each band selected.
Note This is a local feature, which means this setting must be applied to router and then to each mesh point that is part of your AmpliFi system. If you only add the additional SSID to your router, but not to your mesh points, your client devices will only be able to connect to that Wi-Fi network when they are in range of the router.
The password for all SSIDs will be the same as your main network's.
1. Open the AmpliFi app.
2. Select the AmpliFi router icon.
3. Tap on Wireless.
4. Turning off Common SSID Name will broadcast the 5GHz and 2.4Ghz bands independently, and you can rename them if desired. By keeping the Common SSID Name enabled, both bands will be broadcast under one dual band SSID.
 An additional 5GHz AC radio can be enabled if needed. This feature is only available on the US AmpliFi Alien models.
5. Scroll down to the Router Additional SSID section and enable additional band by tapping on the toggle button for each broadcast you would like to create.
6. A default name will be generated, but it can be modified if you would like to change the additional SSID's name. By removing the suffixes -5X,-5G or -2G in the settings, they will be removed from the Wi-Fi network name.
7. Tap ✓ to save your settings.
Adding an Additional SSID on MeshPoints
To configure an Additional SSID on the MeshPoints please follow these steps:
1. Select the mesh point icon.
2. Scroll down to the Mesh Point Additional SSID section and enable each additional band individually by tapping on the toggle button.
3. A default name will be generated, but it can be modified if you would like to change the additional SSID's name. By removing the suffixes -5X,-5G or -2G in the settings, they will be removed from the Wi-Fi network name.
4. Tap ✓ to save your settings.
Important If you wish to remove one of your SSIDs, just follow the same path described in this article and toggle the feature off for each setting.
AmpliFi HD / AmpliFi Instant / AmpliFi Gamer's Edition
How to Create an Additional SSID
The main SSID on these models, will automatically broadcast on both the 2.4GHz and 5GHz bands, and this cannot be changed. If you need to broadcast on only one of these bands, you can create additional SSIDs and select which band it will broadcast, either 2.4GHz or 5GHz .
The additional SSID must be added to each of the devices making up your AmpliFi system. If you only add the additional SSID to your router, but not to your mesh points, your client devices will only be able to connect to that Wi-Fi network when they are in range of the router. You could also add the "additional SSID" to each of the MeshPoints if you wish. Find instructions on how to add an additional SSID to an AmpliFi router and MeshPoint below.
The password for any additional SSIDs will be the same as your main network. If you wish to remove one of your additional SSIDs, just follow the same path described in this article and toggle the feature off for every device that has it enabled.
1. Open the AmpliFi app
2. Select the AmpliFi router icon.
3. Tap on Wireless
4. Scroll down to the Router Additional SSID section and enable additional band by tapping on the toggle button for each broadcast you would like to create.
5. A default name will be generated, but it can be modified if you would like to change the additional SSID's name. By removing the suffixes -5G or -2G in the settings, they will be removed from the Wi-Fi network name.
6. Tap ✓ to save your settings.
Adding an Additional SSID on MeshPoints
To configure an Additional SSID on the MeshPoints please follow these steps:
1. Select the AmpliFi MeshPoint icon.
2. Enable the additional SSID by tapping on the toggle button for each broadcast you would like to create.
3. Tap ✓ to save your settings.
Important: If you wish to remove one of your SSIDs, just follow the same path described in this article and toggle the feature off for each setting.
Go to article page.Create and manage profiles for devices connected to the AmpliFi network with the Family tab. This article includes information on how to create and configure a family profile which allows you to customize the internet experience for different people in your home, how to create "Quiet Time" to allow you to limit screen time, how to pause devices, so they lose access to the internet until you unpause them, and how to view information on this client device's connected at the time. QoS is also configured in the Family section, read about that in this separate article. At this time, AmpliFi does not provide website or content filtering; and it does not store information about browser history.
Note The process for the AmpliFi Alien is the same.
To configure the Family section follow these steps:
1. Launch the AmpliFi app.
2. Go to Devices tab.
3. If this is the first profile you will create, the app will prompt to Add Group.
4. Follow the instructions of a group setup wizard.
5. Select the devices you want to be included in this group.
6. Add Restricted Internet times to prevent all devices that are part of that group to access the Internet at certain times of the day.
Pausing Internet Access on Specific Devices
1. Launch the AmpliFi app, and navigate to the Clients tab.
2. Tap the toggle to "Pause Internet on all devices". This will stop the internet access of all devices seen on the list.
3. If you wish to unpause a device simply tap the resume button near the device and its connectivity will be restored.
Go to article page.WPS (Wi-Fi Protected Setup) allows users to easily connect devices (like wireless printers and wireless cameras for example) that support WPS to the AmpliFi system. WPS can be enabled temporarily via the AmpliFi app or the webUI, take a look below:
Enabling WPS on the AmpliFi mobile app
1. Launch the AmpliFi app.
2. Select the image of the router.
3. From the main Settings section, scroll down to "WPS on LCD" and tap the toggle to enable. Notice on the screenshot to the right, which is what AmpliFi Instant and AmpliFi Alien users will see, this is the last step to enable WPS. Other users will have to take one step further and long-press on the router LCD screen.
4. Tap the check-mark to save your settings.
5. Once enabled, long press the LCD screen on the AmpliFi router to start WPS. Disable it later on from the LCD screen as well. If you are using an AmpliFI Instant or AmpliFi Alien router you will not have to touch the LCD screen, after saving your settings, WPS will be enabled for two minutes.
6. Make sure WPS is also enabled in the device you are trying to connect to AmpliFi (for example a wireless printer, a wireless camera, etc).
Enabling WPS on the webUI
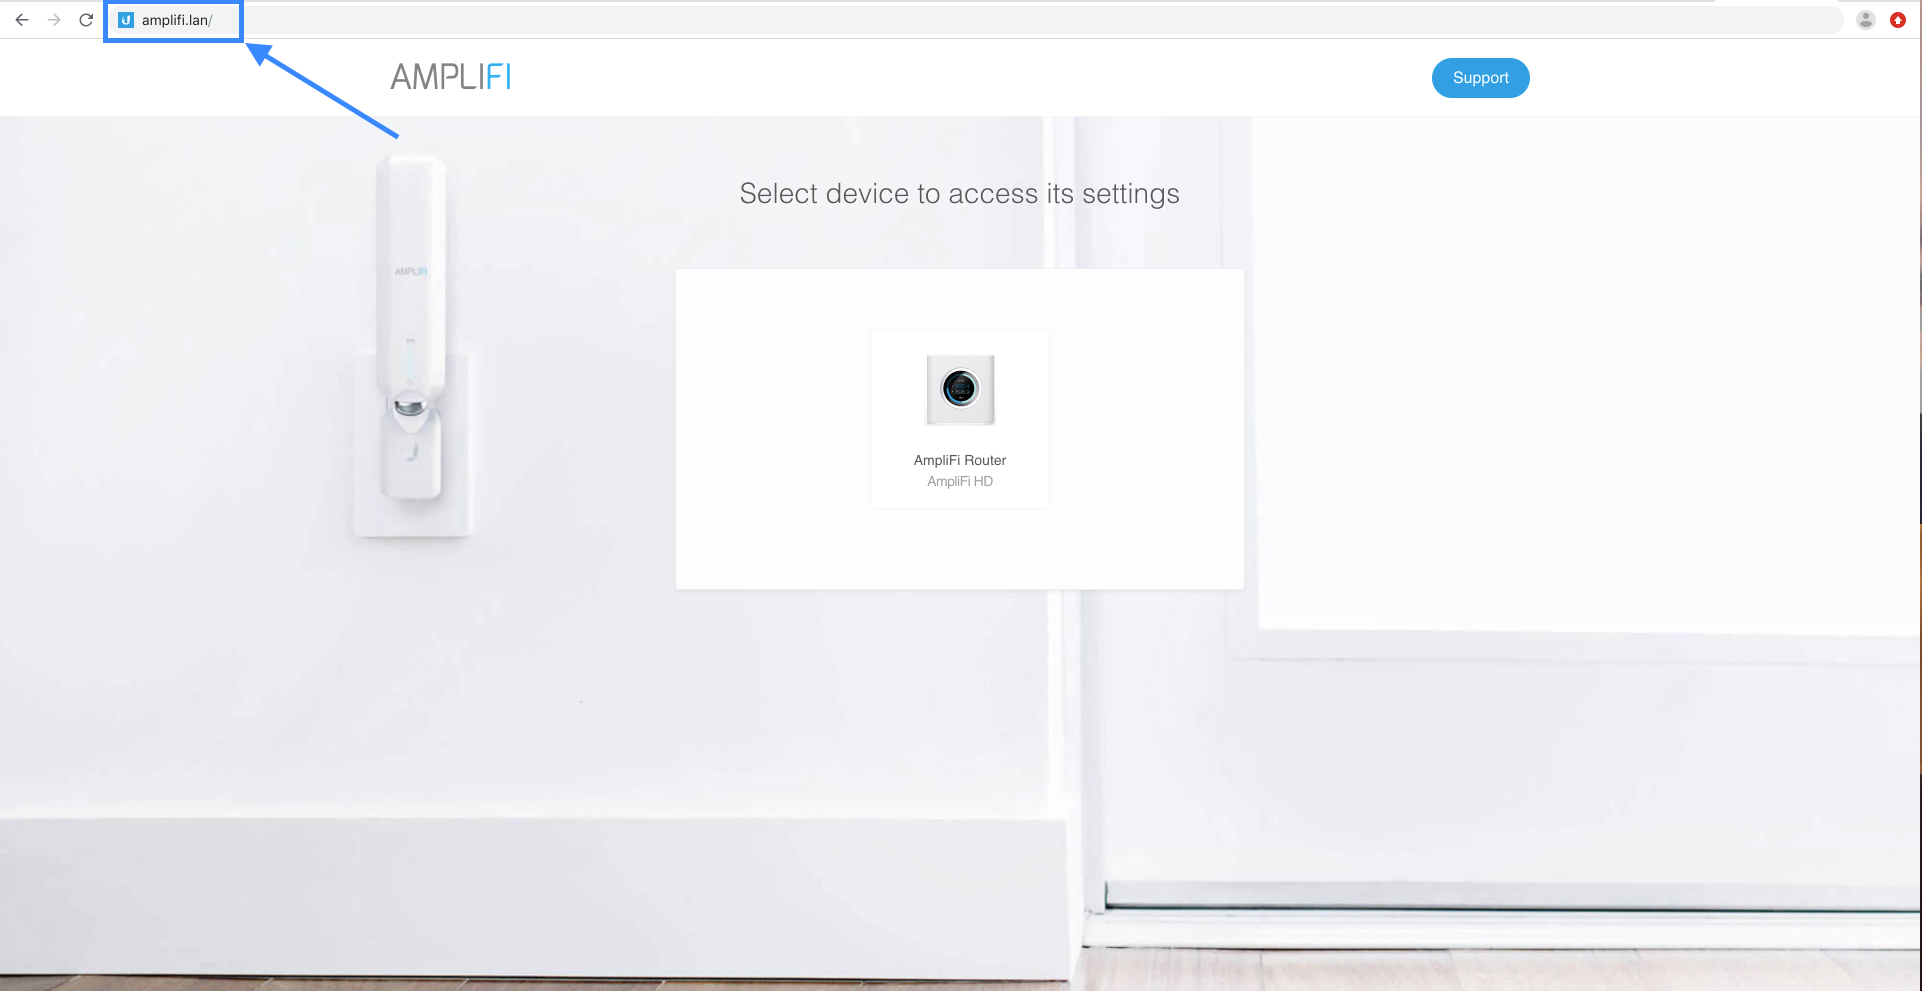
1. Use a browser to navigate to http://amplifi.lan
2. Click on the Support button and choose WPS under tools. WPS will be enabled for three minutes. Make sure WPS is also enabled in the device you are trying to connect to AmpliFi (for example a wireless printer, a wireless camera, etc).
Go to article page.HomeKit can now be enabled on your AmpliFi Alien router on standalone setups running firmware 3.7.0 or later and iOS mobile app 1.16.0 or later.
More information about HomeKit can be found on the Apple website.
To meet HomeKit's security requirements, your AmpliFi settings will need to be modified and some networking features will no longer be available. These features include, but are not limited to:
- Bridge mode
- DNS cache bypass
- Hardware acceleration
- IGMP snooping
- Quality of service (QoS)
- Additional AmpliFi Mesh points
How to Configure AmpliFi Alien to Enable HomeKit
Note: To enable HomeKit on your AmpliFi Alien router you will need to be on the same WiFi network and have at least one Apple Home bridge compatible device (Apple TV or HomePod Mini).
- Tap on Apple HomeKit from the property panel.
- Tap Set up HomeKit and follow the HomeKit setup wizard.
- Once setup is complete, proceed to the Apple Home app to configure security settings for each accessory.
Advanced Configuration
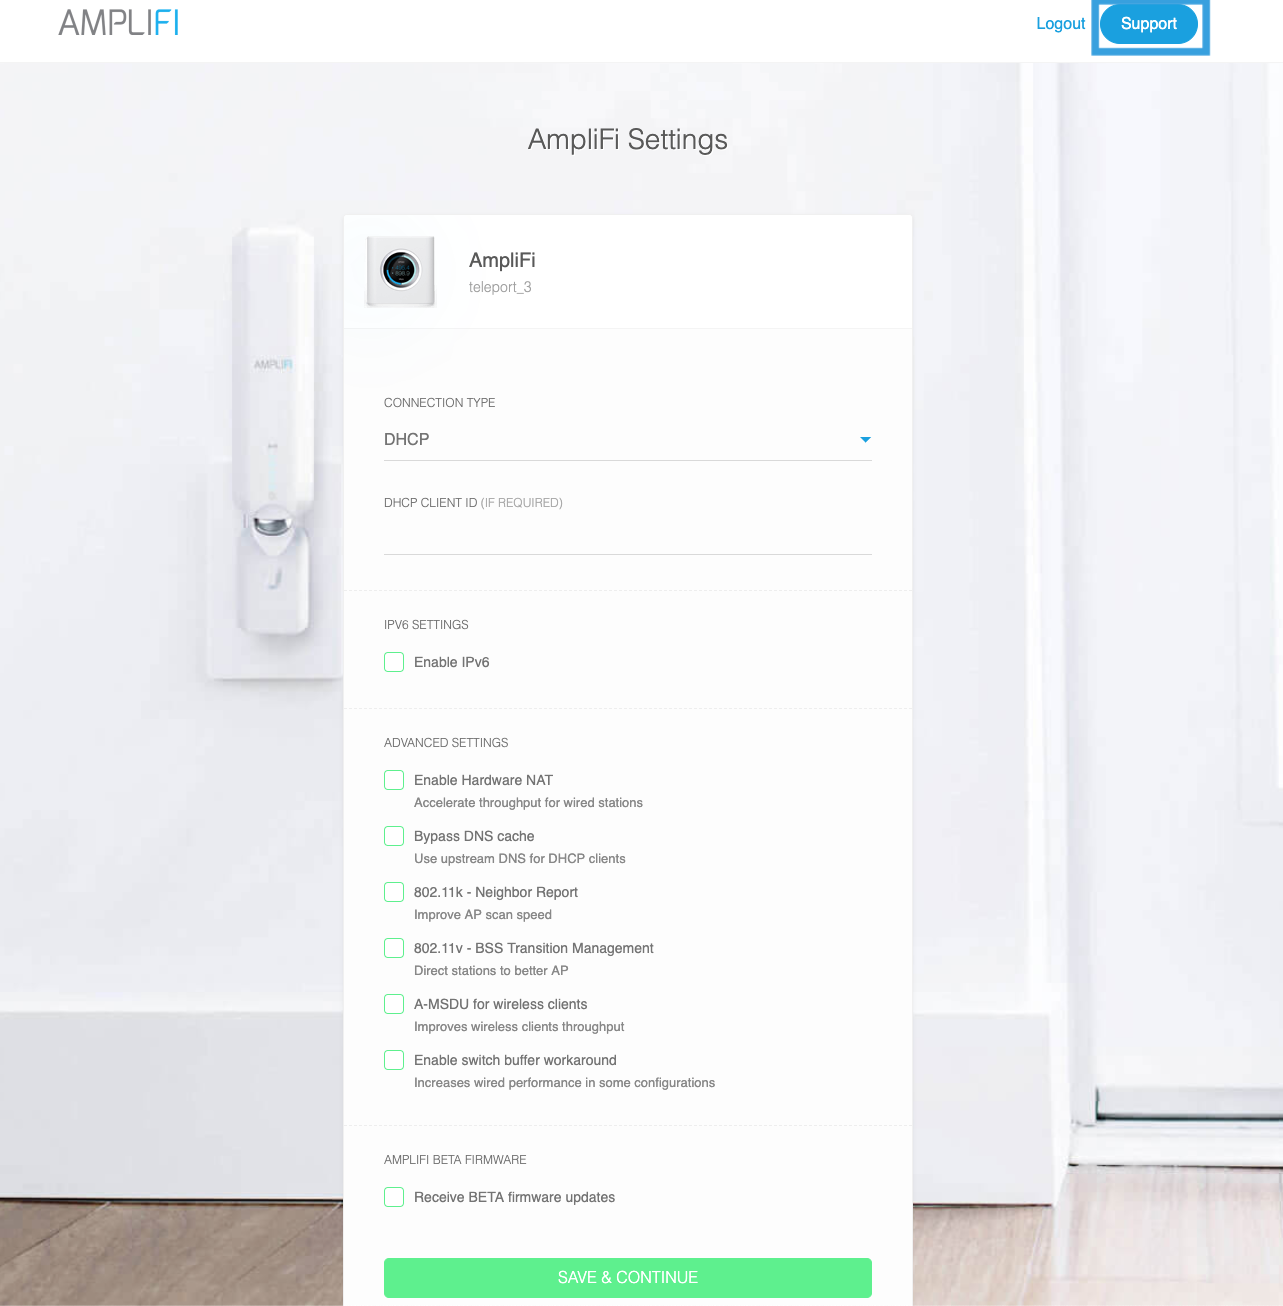
You are able to easily enroll your AmpliFi equipment for our Early Access firmware through the AmpliFi web interface. Changes to the firmware currently being tested through our Early Access program can be found on our AmpliFi Community
IMPORTANT If you are trying to unenroll in the Early Access firmware then follow these steps but have the box unchecked instead of checked
Follow these steps to understand how to enroll for the Early Access firmware:
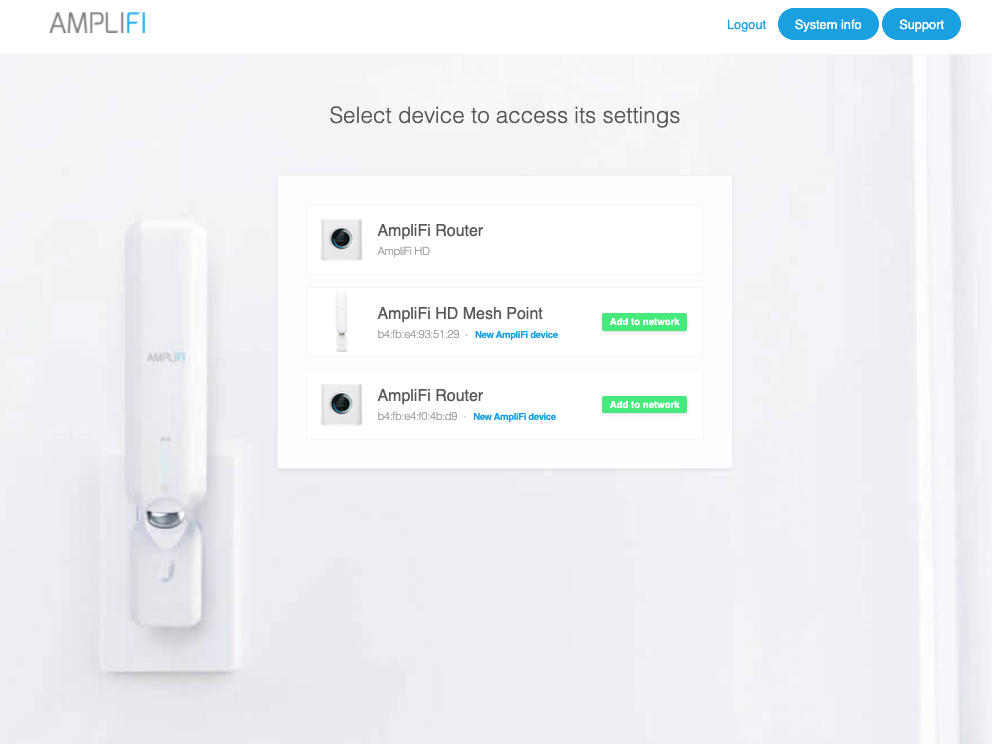
- Access the AmpliFi web UI by navigating to http://amplifi.lan/. You must be on the local network (connected with your computer to the AmpliFi network).
- Select your router to access its settings
- Towards the bottom of the settings page you will see an option to 'Receive Early Access firmware updates'
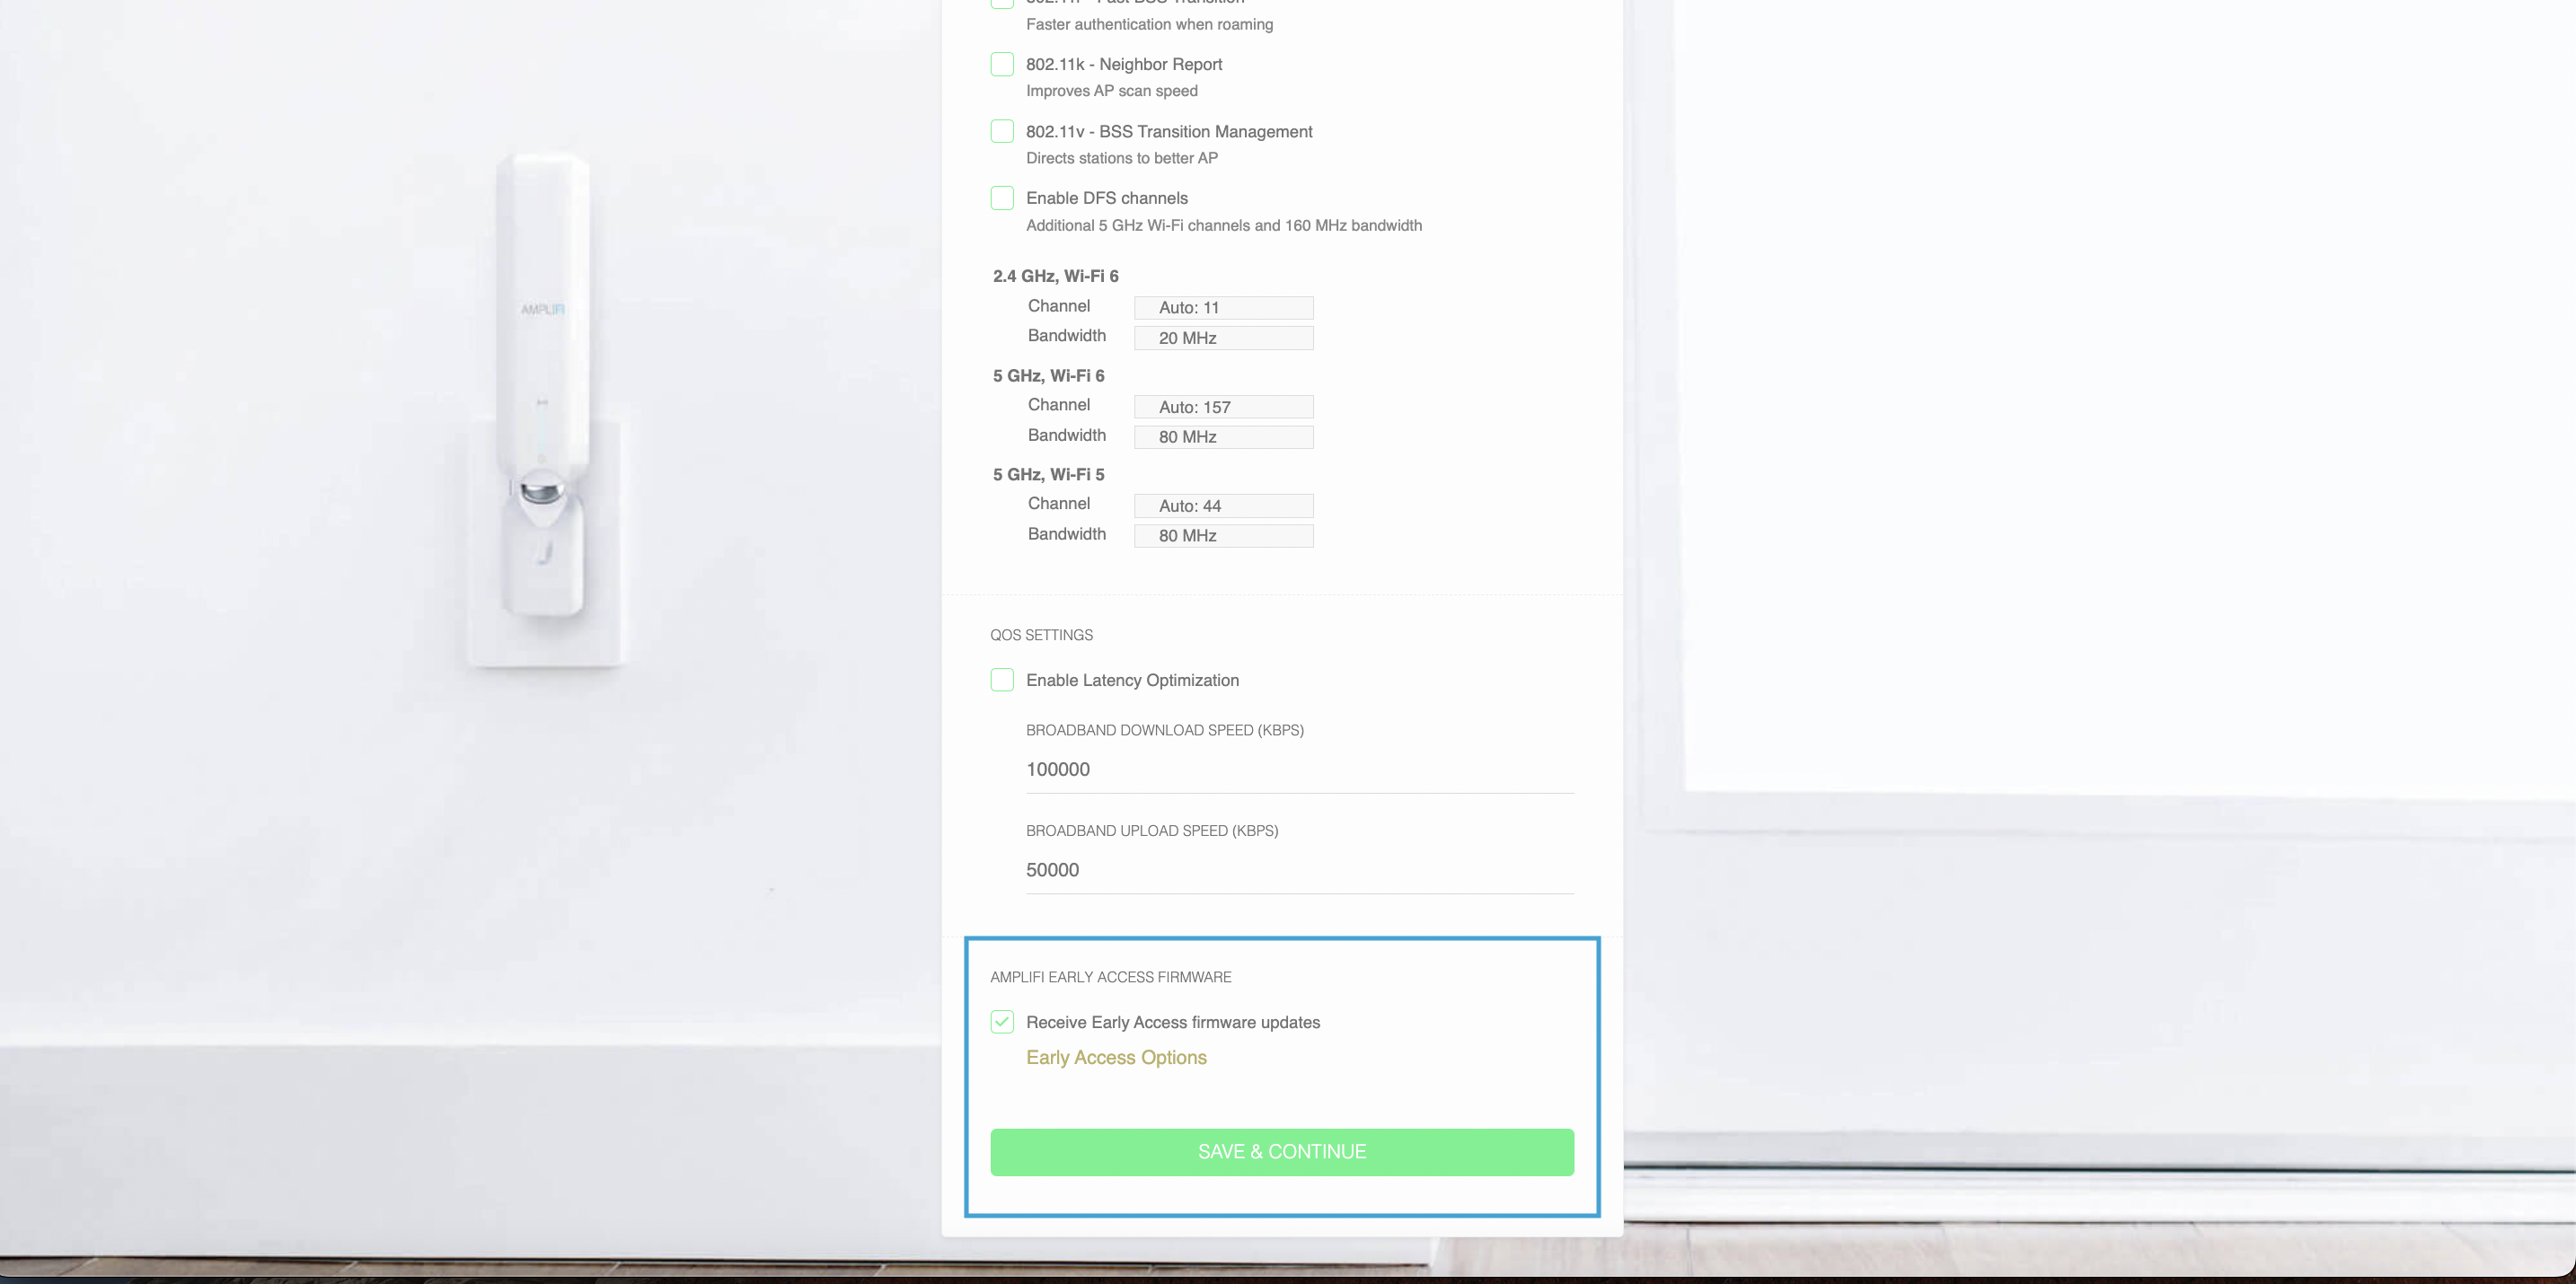
4. Once the option is checked, select Save & Continue on the bottom to apply the change.
Early Access firmware updates should now be pushed out to your AmpliFi equipment.
If you are looking to roll back your firmware take a look at this article.
Go to article page.
An AmpliFi IoT network allows users to keep their IoT devices in a separate subnet and isolate them at an IP level for increased security.
These are a few details of the IoT network feature:
- The IoT network feature is available for AmpliFi Alien, Gamer's Edition, HD, and Instant models starting on firmware version 3.7.1.
- The IP address given to devices on this network will be 192.168.251.x.
- Devices on the IoT network will only be able to communicate with each other and the Internet.
- The IoT network works while on bridge mode as well; in a manner similar to how a guest network functions.
To enable an AmpliFi IoT network on the AmpliFi mobile app:
- Launch the AmpliFi app.
- Select your router.
- Select Wireless settings.
- Scroll down to the IOT NETWORK section and enable the toggle. This will create an additional SSID on all routers and mesh points on this network.
- Move the devices you wish to separate from the main network to this SSID.
Support information is a great way for the AmpliFi team to help diagnose any issues that may be persisting inside the AmpliFi system. There are a few ways to download the support information, through the AmpliFi app or through the AmpliFi web UI.
How to Download Support Information Via the App
1. Open up the AmpliFi app.
2. Select the AmpliFi router icon.
3. Scroll to the bottom of the settings page and tap on "Support info".
4. Select "Proceed" to begin the download.
5. The app will prompt you to use an email app if it does not automatically open it, select send and the file will be received by the support team.
How to Download Support Information Via the WebUI
Note The process is the same for AmpliFi Alien equipment.
1. Navigate to http://amplifi.lan/.
2. Click on support in the top right side of the page.
3. At the bottom of the page click "Download Support Info".
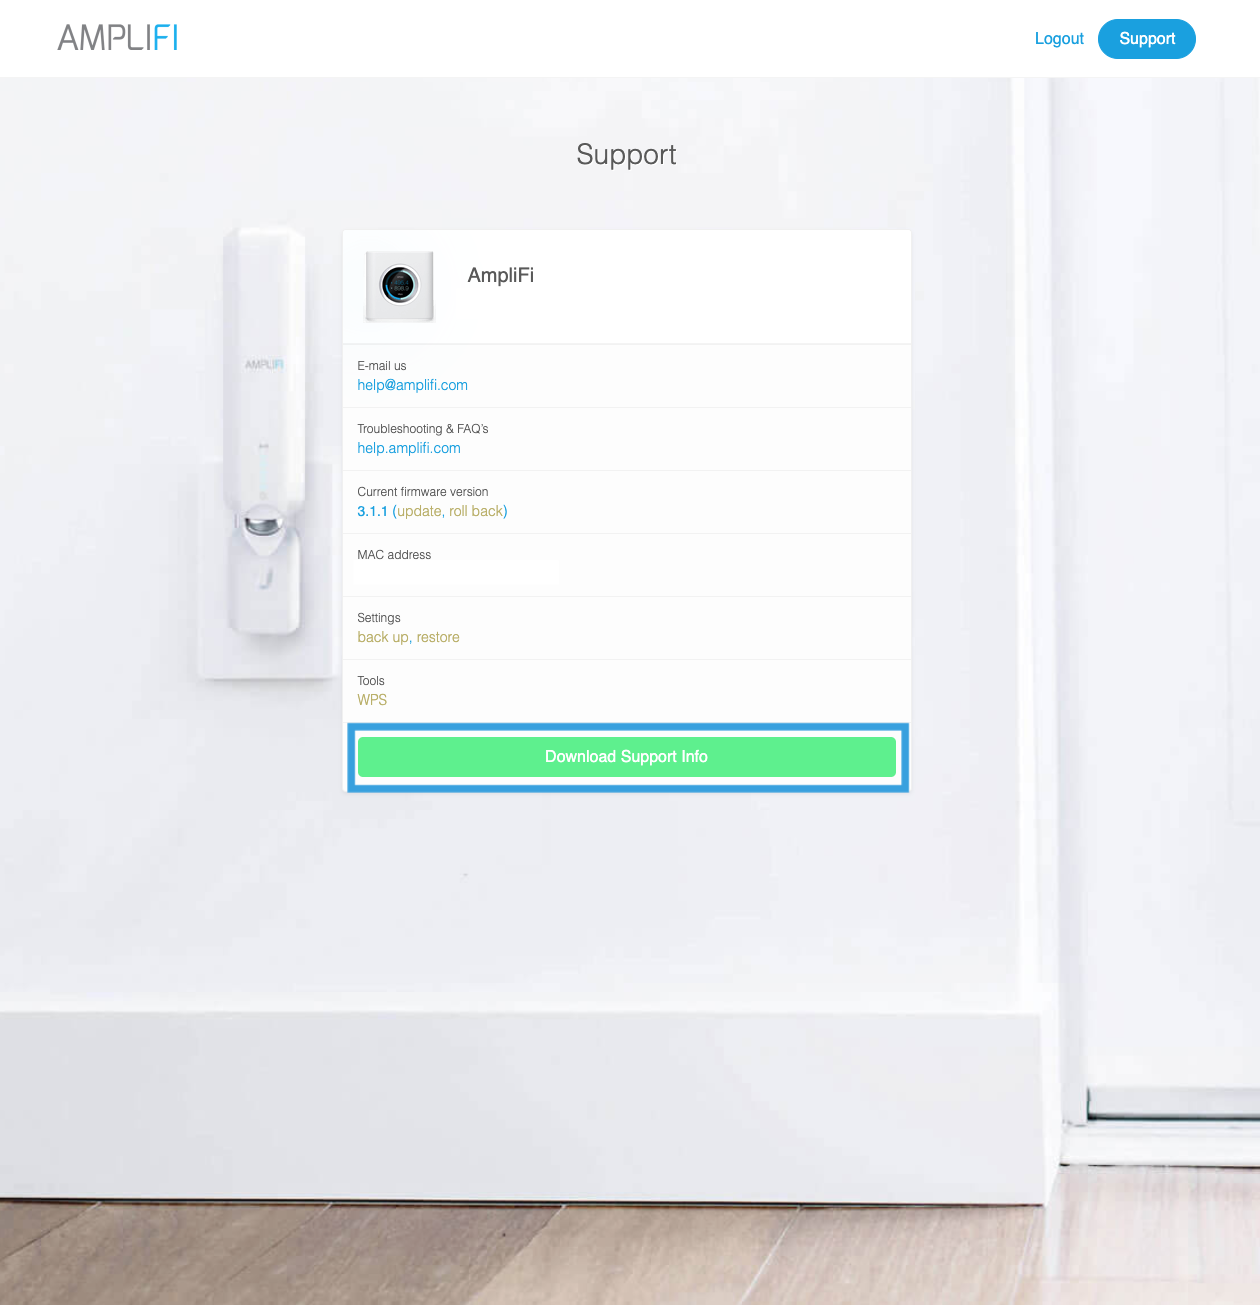
4. This will download a support file to the computer.
5. Send the support file as an attachment in an email to help@amplifi.com.
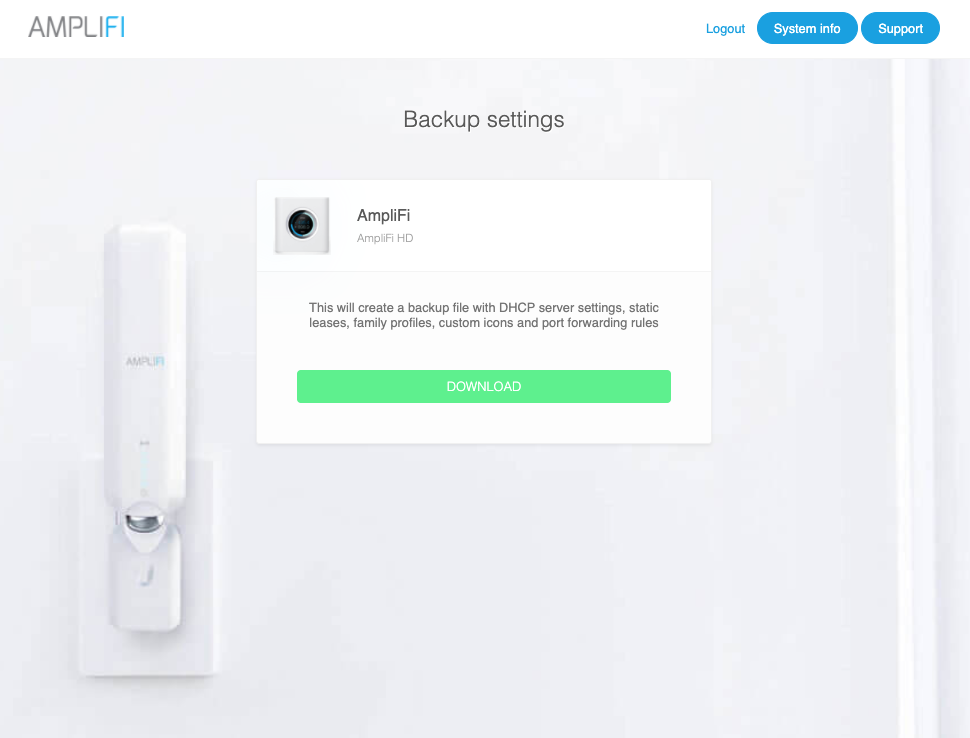
Go to article page.AmpliFi's settings can be backed up and restored through the Web Interface. This feature will allow you to back up your AmpliFi configurations before performing a Factory Reset, in order to restore them afterwards.
The settings that are backed up are:
- DHCP server settings
- Static leases
- Family profiles
- Custom device icons
- Port forwarding rules
Please note that backups do not include guest network settings. These will have to be set up again after restoring a backup.
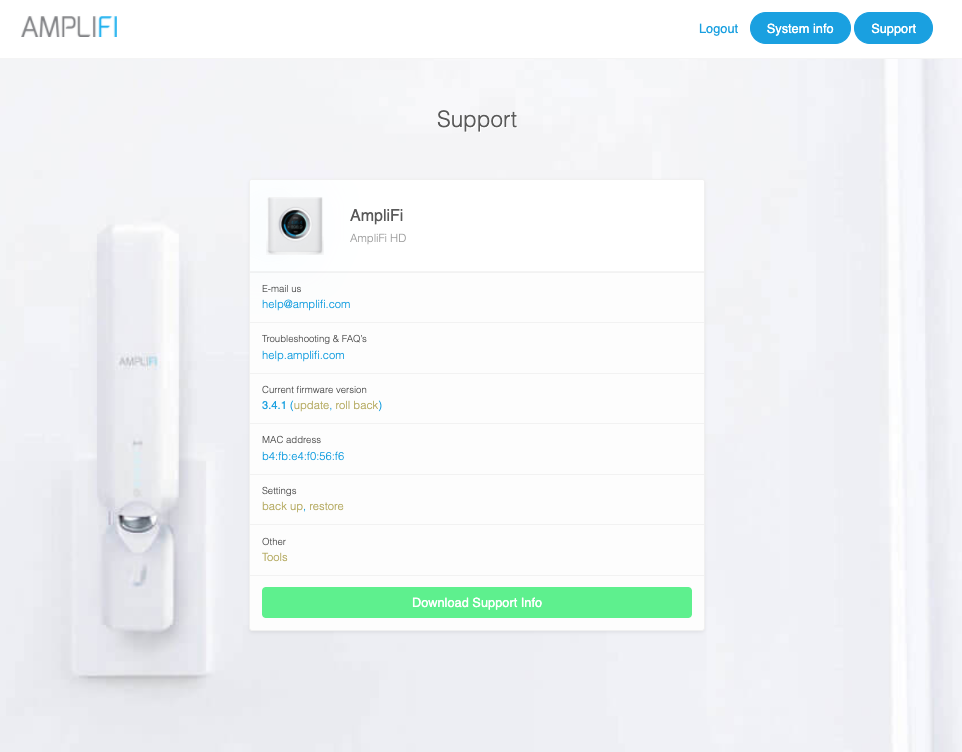
1. Navigate to the web UI http://amplifi.lan/ and click support in the top right of the page.
3. In the list of options under Settings is the ability to backup or restore. "Back up" is used to download the settings and "Restore" is used to return those settings to the AmpliFi router.
Backup
1. If backup is selected, the screen will prompt you to download a file to your personal device.
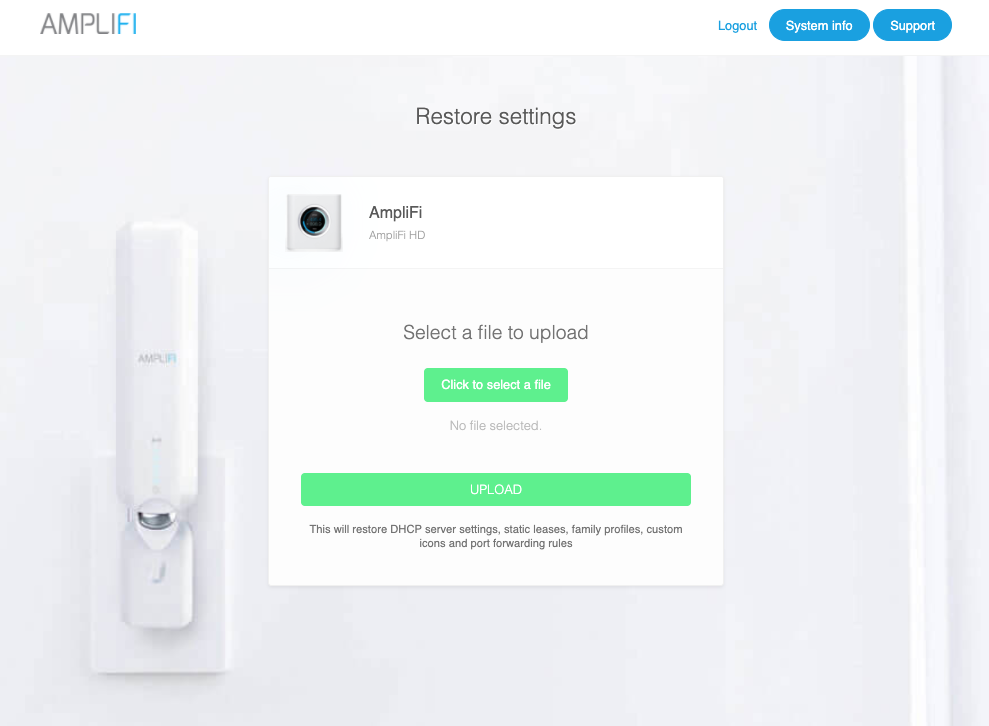
Restore
1. Select restore.
2. Click on "Click to select a file".
3. Find the backup file that was downloaded.
4. Once verified, select "upload" to upload the file to restore the router settings.
Assigning your devices a static lease ensures they will always have that same IP address. Static IP addresses are necessary for services such as remote access and creating port forwarding rules; and can also be useful to keep track of the IP addresses of key devices that are commonly connected to a network.
There are two ways to create a static lease within the AmpliFi App:
Assign a static IP to a device that is currently connected to the network
Assign a static IP to a device that is not connected to the network
Assign a Static IP to a Device That is Currently Connected to the Network
1. Launch the AmpliFi app.
2. Select the Devices tab, then tap the device you wish to create a static lease for.
3. Select Create Static Lease
4. Give the static lease a name, and select an IP address.
5. Tap ✓ to save your settings.
Assigning a Static IP Address to a Device That is Not Connected to the Network
1. Launch the AmpliFi app.
2. Select the AmpliFi router icon or go straight to Settings tab.
3. Select DHCP Server.
4. Select Static Leases.
5. Tap the plus sign in the top right corner to create a new static lease.
6. Give the static lease a name. Enter the MAC Address from the device you wish to assign the static IP, and select an IP address.
7. Tap ✓ to save your settings.
Note You may need to assign this IP address to your device as well for it to connect to the AmpliFi network.
Go to article page.
Before proceeding to follow these instructions, please verify that your AmpliFi system is running the latest firmware and the mobile app is running the latest software. The IPv6 option can be enabled through the app or through the advanced web UI.
Note It is recommended to always upgrade to the newest release available. In the case of IPv6 configuration, it is necessary to be using as a minimum the following versions: AmpliFi router firmware v2.2.0 or later, iOS and Android App v1.6.0 or later.
Please follow these steps to locate and enable IPv6.
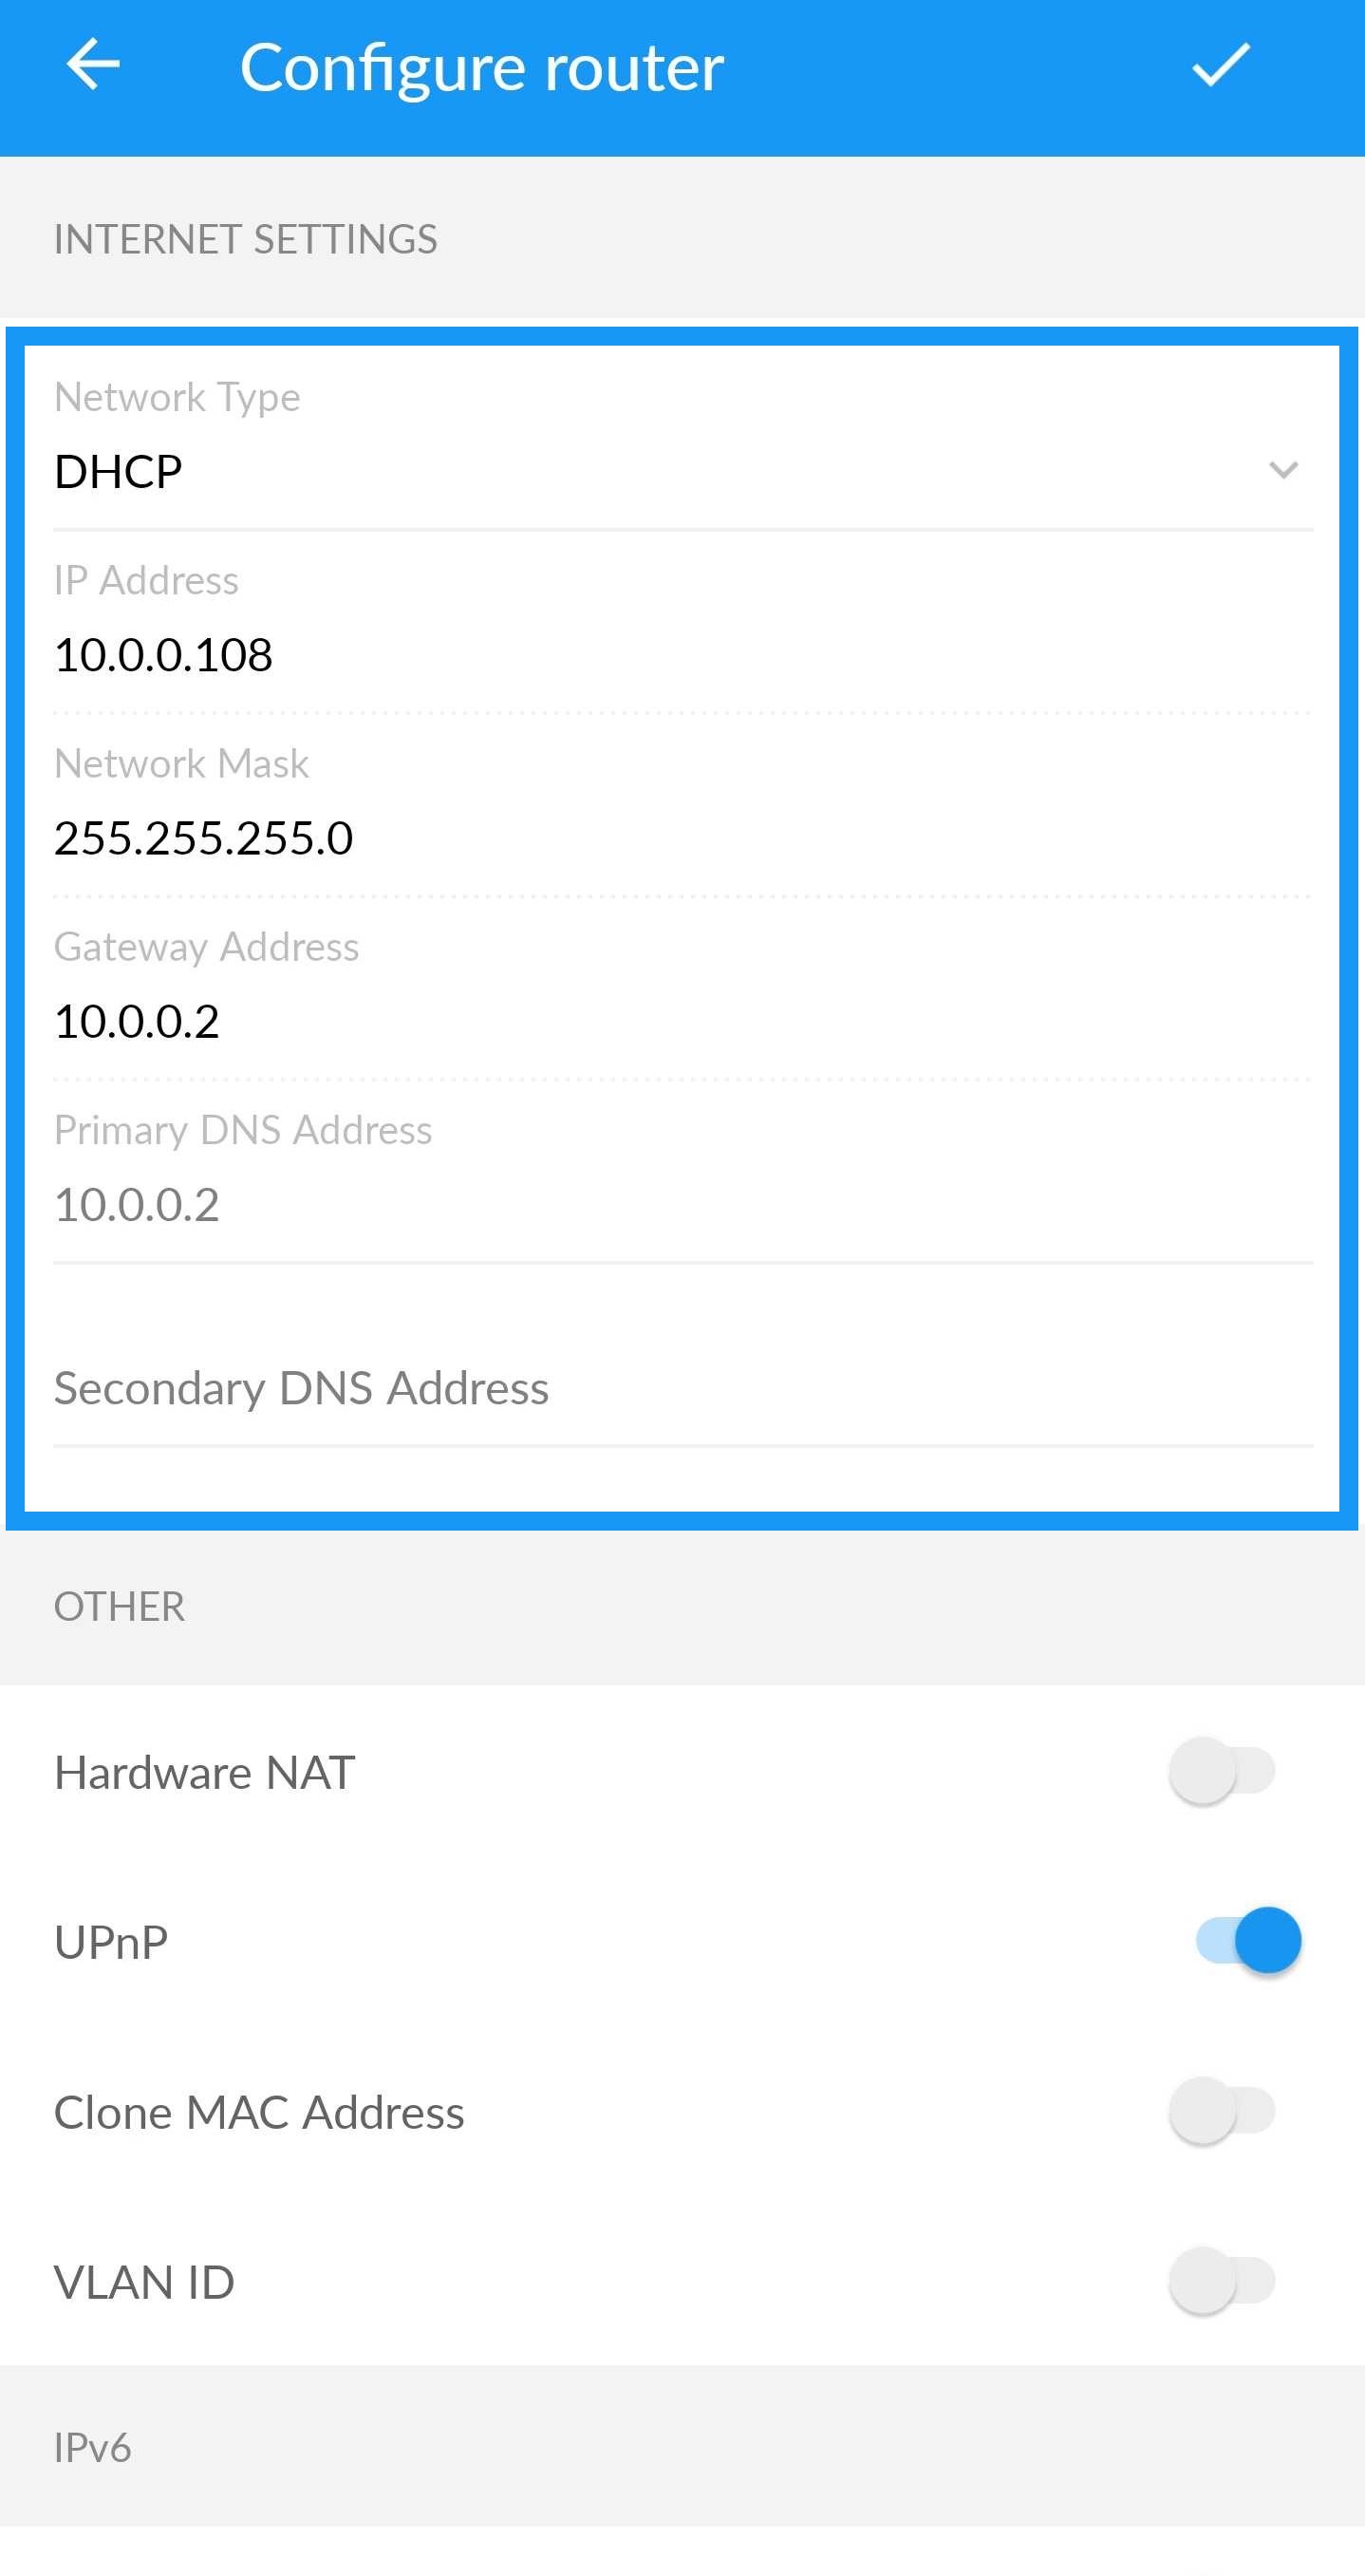
Via the AmpliFi app
1. Open your AmpliFi smartphone app.
2. Tap the image of the router to open the router's settings.
3. Select the "Internet".
4. Scroll down to "IPv6" and toggle this setting On. Once it is enabled it will be blue and have a drop down menu for further configuration.
5. Verify the corresponding Network Type.
- DHCPv6: This mode should be used in most cases. It requires native IPv6 connectivity from your Internet Service Provider (ISP). The "Client ID" field is used with the DHCPv6 protocol, but this is not a required field. If you need a Client ID, please contact your ISP in order to receive an IPv6 address.
- 6to4: This mode can be used when your ISP does not provide native IPv6 connectivity.
6. Tap the check mark on the top right corner to save your settings. If you encounter issues after following this guide, please see our Troubleshooting article.
Via the advanced web UI
1. Go to the web page http://amplifi.lan/ on a computer.
2. Once in the web page select your router and enter in the password.
3. You will see a list of options, select enable IPv6 and specify the network type
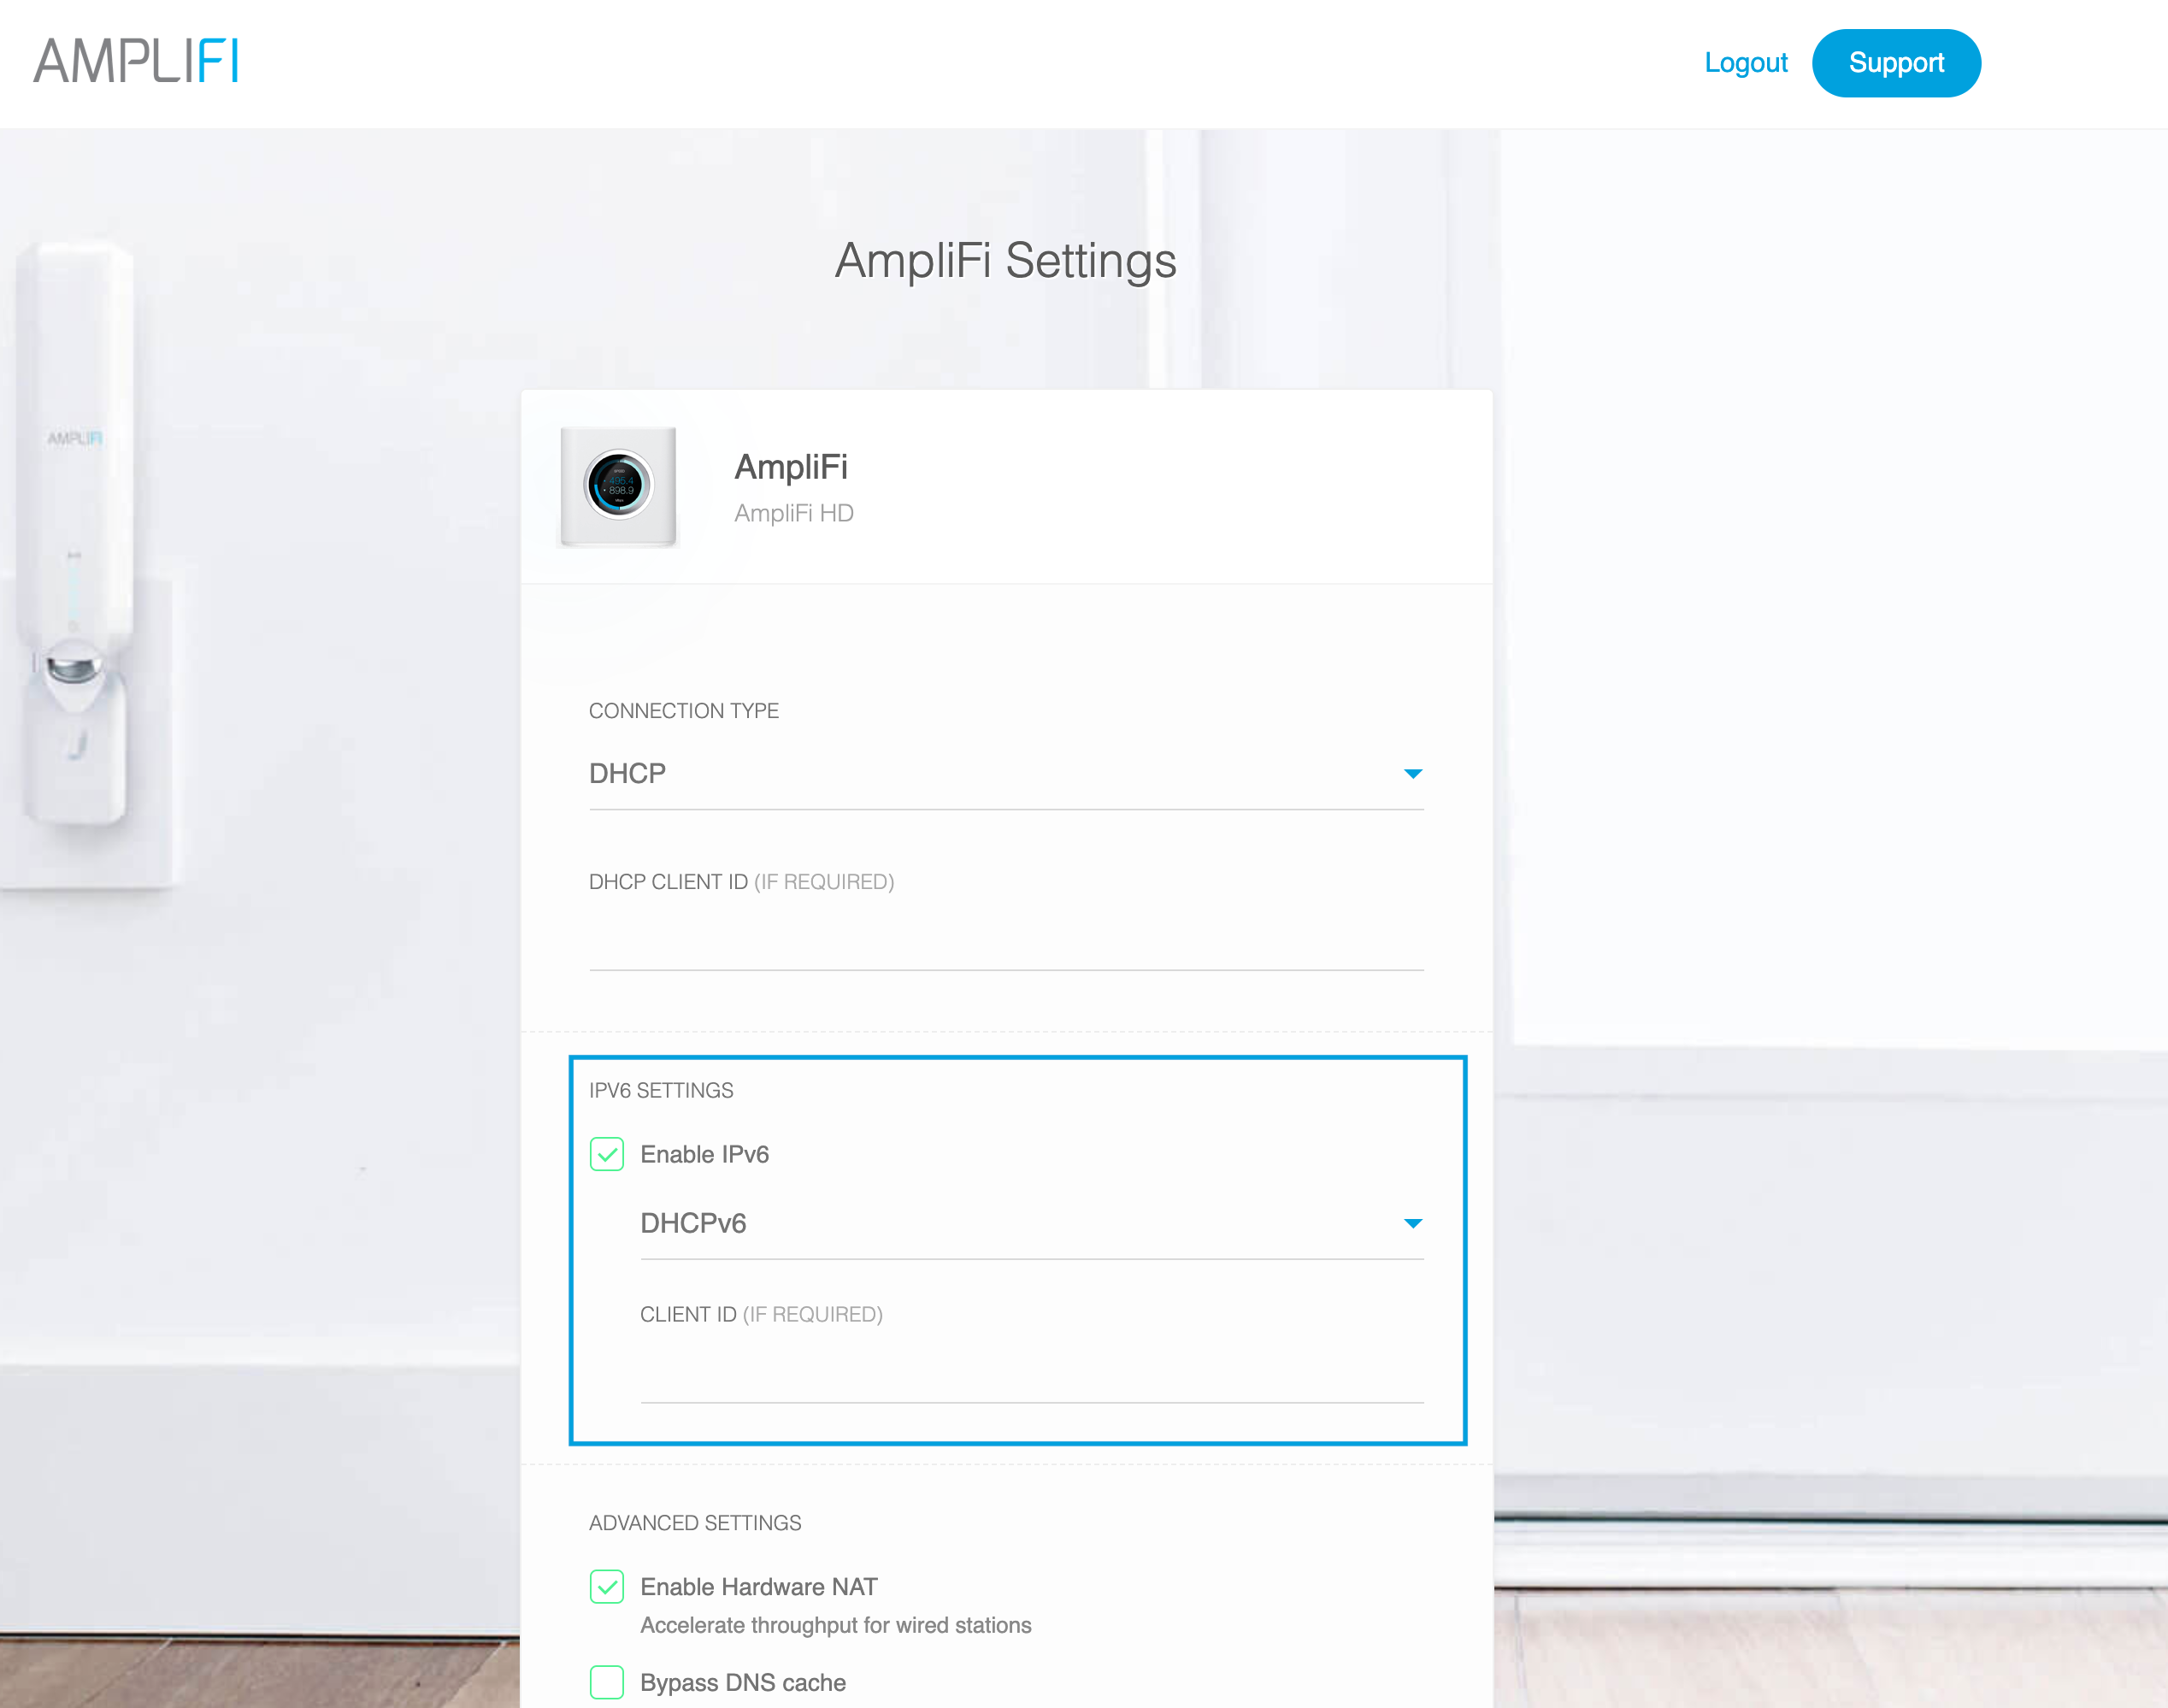
4. Verify corresponding Network Type
- DHCPv6: This mode should be used in most cases. It requires native IPv6 connectivity from your Internet Service Provider (ISP). The "Client ID" field is used with the DHCPv6 protocol, but this is not a required field. If you need a Client ID, please contact your ISP in order to receive an IPv6 address.
- 6to4: This mode can be used when your ISP does not provide native IPv6 connectivity.
5. Once set click save & continue on the bottom of the page
6. If you encounter issues after following this guide, please see our Troubleshooting article.
Go to article page.
Troubleshooting
All devices can be reset using the reset button on the device. If you're having a hard time locating the reset button, please take a look at the Quick Start Guide of your specific device. Please note that a factory reset will bring your device back to "out of the box" status, so you will need to set it up again: including any pairing with MeshPoints or Teleport. After resetting any of these devices you must use their Quick Start Guide to set them up once again. If you are not completely locked out of the system, you may create a backup before resetting in order to restore your configuration later.
Find instructions to reset the Routers, MeshPoints, Teleport and Alien below.
Reset for Routers: AmpliFi Router, Instant Router, Gamer's Edition Router and AmpliFi Alien Router
Important If you are performing a factory reset on an AmpliFi kit versus a standalone router, you will need to factory reset the MeshPoints as well. Reset the MeshPoints first and then the main router.
Physical Reset
Use a straightened paperclip or similar thin object to press the Reset button located on the bottom of the AmpliFi router for 5 seconds or until the screen shows rebooting. Then release.
Reset via the AmpliFi App
1. Launch the AmpliFi app.
2. Tap the icon of the AmpliFi router.
3. Tap General.
4. Scroll down to the bottom of the screen and tap Factory Reset.
The AmpliFi will proceed to reset. If your AmpliFi is stuck booting up after the reset please try unplugging the router (and MeshPoints if they are also part of the setup). Wait three minutes and plug them in again to restart the system.
Physical Reset for MeshPoint
The AmpliFi MeshPoint can be reset by holding a paperclip into the reset hole located on the left hand side of the MeshPoint itself. Make sure the MeshPoint is plugged in and hold the paperclip in for 10 seconds or until a load tone is output.
Physical Reset for Alien Router
The AmpliFi Alien Router can be reset by holding a paperclip into the reset hole located on the bottom of the router next to the WAN port and power plug in. Hold the paperclip in the hole for 10 seconds or until the front of the router says rebooting.
Physical Reset for Teleport
The AmpliFi Teleport can be reset by holding a paperclip into the reset hole located on the bottom of the Teleport device next to the ethernet jack. Hold the paperclip in for 10 seconds.
Go to article page.An unstable wireless connection can be a result of several factors. Follow the steps in each of these sections to overcome stability issues. If your instability is hardware related (unexpected router reboots, or restarting for no apparent reason, please see this article: Troubleshooting: Unexpected Reboots.
Move to a Channel with Minimum Interference
1. Launch the AmpliFi app and select your router. Under Settings, tap on Wireless to select.
2. Scroll down and select Advanced.
3. On the 2.4GHz and 5GHz drop-down menus, select a channel with minimal interference.
Note If you do not know what channel has minimal interference, please perform a scan of your area. In the event you do not have the means to scan local Wi-Fi channels you can perform a factory reset of your AmpliFi router, click here for instruction. The factory reset will trigger an automatic scan and choose the channel best suited for your area.
MeshPoint Signal Strength
1. Low mesh point signal may cause stability issues. To view the signal of your mesh point launch the AmpliFi app and select the mesh point icon displayed.
Tip Alternatively you can look at the status LEDs on the MeshPoint and verify that all five LEDs are illuminated, meaning it has 100% signal level. Less than five LEDs would indicate a signal less than 100%.
2. If the MeshPoint LEDs or the signal quality bar in the AmpliFi app reflect that it needs improvement, you can move the mesh point closer to the router or keeping the MeshPoint in place, you can move the antenna around to receive better signal, trying to aim the face of the mesh point towards the router.
3. You can also try changing the mesh point backbone band to 2.4GHz for longer range, if 2.4GHz is not congested in this area. To do so, simply select the Mesh point backbone band drop-down menu and choose 2.4GHz. Save the configuration changes by tapping the check mark in the top, right-hand corner of the screen.
Tip In homes with thick walls 5GHz may not have as much coverage, try switching to 2.4GHz or adding more stand alone mesh points.
Band Steering
1. Band steering encourages devices that are 5GHz-capable to migrate to the 5GHz spectrum, freeing up the 2.4GHz bands for older devices that are not 5GHz capable. This feature can be enabled in the AmpliFi app by selecting the router icon, and navigating to Settings > Wireless.
2. Scroll down the page and toggle Band Steering on. Save your changes by tapping the check mark in the top, right-hand corner of the screen.
Test an Additional SSID
Test the stability of a different SSID. Create a separate Wi-Fi network that your devices will connect to by following these steps:
1. Launch the AmpliFi app and select the AmpliFi router icon.
2. Navigate to Settings > Wireless. Scroll down to the Additional SSID subsection and toggle the switch to On. Select 5GHz and test stability on this band. If issues persist select 2.4GHz and continue testing stability. Remember to tap the check mark each time to save the configuration before testing.
Environmental and Other Factors
1. Environmental factors in your home may be causing interference with your AmpliFi system. If you have another router or modem that has wireless enabled, try disabling it. If there are other devices that could cause interference, try moving the AmpliFi system away from them. Possible sources of interference are: microwaves, phones, satellite receivers, LCD televisions, speakers, and possibly even your neighbors router.
2. Forget the network and reconnect to it. Check your mobile's support documentation to learn how to do this, but as an example: to forget a network on Android, open Settings and select Wireless Connections. Long press the network your AmpliFi is broadcasting and select forget network. Take note of your wireless password before doing so: your phone will loose the credentials once the network is forgotten.
3. Check cables for faults or possible shorts. If you have another Ethernet cable try testing it to verify cables are in good working order. Ensure that the cable is fully inserted in the router's RJ45 port; it should make an audible click when inserted fully.
Go to article page.Before troubleshooting, find out what speed you have from the internet service provider (ISP) and confirm that it is currently set up according to that agreement. Additionally, if you have only tested speeds using one option (like the in-app AmpliFi speedtest) make sure to "find a second opinion". Perform a speed test on a wireless device and a wired device using speedtest.net. If you notice that your speed issues are only apparent on the wireless device, go to this article: Stability Issues. If you're experiencing speed issues when devices connect to one of the MeshPoints but not the router, take a look at this other article: Slow Speeds on Mesh Points.

If you notice slow speeds on both wired and wireless devices or only wired, please proceed to the troubleshooting steps below:
1. Using an Ethernet cable, connect a laptop (or any device that allows a wired connection) directly to a LAN port on the modem provided to you by your internet service provider (ISP) and run a speedtest. If the speeds are slow, there may be an issue with the modem or the service. Contact your ISP for help. This issue would be unrelated with AmpliFi.
2. To rule out a defective cable issue, replace both cables: the cable running from the modem to the WAN (blue port) of the AmpliFi router, as well as the cable going from the LAN port of the router to your laptop. Run a speedtest again. A defective cable connected to the WAN port would result in bad performance for both wired and wireless devices; while a defective cable connected to a LAN port would only affect the device connected to it.
3. If your ISP says you should be seeing gigabit speeds, then we recommend enabling Hardware NAT. Please keep in mind that if this feature is enabled in plans with lower speeds, it could actually be detrimental to the network, so only enable it if that's the case. See this article for instructions: Enabling Hardware NAT. Run a speedtest again.
Important If troubleshooting with an AmpliFi Instant or AmpliFi Alien system skip this step. The AmpliFi Instant router is not capable of reaching gigabit speeds so does not have the hardware NAT feature; and the AmpliFi Alien has this feature built in so it is not available for configuring on the app.
4. If the slower speeds are only seen on some devices, but not all, it's possible that the device itself cannot accept higher speeds. For example, a smart TV may only have 1/10/100 Mbps ports and will not receive gigabit speeds. Check the client device's information and make sure the chipset allows gigabit speeds (or whatever speed you are attempting). If it does not, note that speeds will be limited on that specific wired device.
5. If the AmpliFi router is connected to another router (or a modem/router combo provided by the ISP) there will be two routers acting as "gate keepers" and performing all router duties twice, slowing down the network. The solution would be to enable bridge mode on one of them. You can contact your ISP and have them enable bridge mode on the modem/router device, or you can enable it on the AmpliFi router. Please note that you'll lose all router functionalities on AmpliFi once bridge mode is enabled. Read more about this in the article: Enabling Bridge Mode.
If none of these steps have helped improve your speeds, please contact our support team and let them know you have already tried this article.
Go to article page.If slow internet speeds are experienced when connected specifically to a MeshPoint please follow these steps to solve the issue. Please note that you may be facing external factors such as interference; to troubleshoot interference please click here. Some tips in this article are specific to our MeshPoint device, but remember that routers can be set up as mesh points (RAMPs) and the advice below will still apply.
Signal Levels
Ensure that the mesh point has adequate signal levels by following these steps:
- The MeshPoints have five LEDs that display the current signal level. Five lit LEDs indicate 100% signal level. You should have at least 80% signal, or four LEDs. Routers as mesh points will show their signal strength on their LCD screen (you should strive to have GREAT signal). If you prefer to see more precise percentage levels you can use the app: tap on the mesh point device and then see the signal level displayed.
- Improve signal by ensuring the MeshPoint's front is facing in direction of the AmpliFi router. It is recommended to place MeshPoints in open areas free of thick walls or metal obstructions.
- Try moving the mesh point to different locations of the area being covered. Note that the mesh points should not normally be within 30 feet of each other.
Backhaul Band
Change the wireless backbone bands to improve speeds by following these steps:
- Launch the AmpliFi app.
- Select the Mesh Point.
-
Select the drop-down menu underneath the "Backbone" settings.
- Choose either 5GHz for close range and higher performance, or 2.4GHz for longer range.
Other Considerations
If you are using the mesh point in a noisy radio frequency area the performance will be affected. If the walls are metal or thick, more mesh points could be needed to properly cover the area. Note that if the mesh points are feeding through another mesh point (daisy chaining), the performance can be slightly degraded.
Go to article page.If the AmpliFi router displays a "No IP Address" error please perform the following steps to resolve the issue. This article will also help with IPv4 errors. IPv4 is a protocol that allows a network to identify a device and its location in the network. When AmpliFi is not being assigned an IP address it is unable to communicate with the modem and will probably show a No IP Address message on the router LCD screen.
Tip A new cable should be used during troubleshooting to ensure the original cable was not the culprit.
1. Leaving the Ethernet cable plugged in between the two components (AmpliFi router and modem), power them both off completely. Unplugging them from their power supply is a good method.
2. Once they are both powered off, plug only the AmpliFi router into power. Allow the AmpliFi to fully reboot before proceeding to Step 3. You'll know the AmpliFi router is fully booted when the message "Plug in Cable" appears on its LCD screen.
3. Power up the modem next. Please give the modem up to five minutes to fully reboot. Check if the message is still present before continuing to the next step.
4. If the issue persists, verify that the modem or modem/router combo used along with the AmpliFi router is in bridge mode. This can be done by checking the modem settings or contacting your service provider. If the modem is operating in DHCP mode, then enable bridge mode on the AmpliFi router via the app. The important point here is that if you have two routers in your network: your AmpliFi router and a modem/router combo provided by your ISP, one of those two need to be in bridge mode.
5. Contact your internet service provider and ensure that you have a connection to the internet. That there are no outages in your area or that you have not had your service suspended for some reason. You can also let your provider know you are adding a router to your network, and determine if there is any action on their side that should be performed for the configuration to work.
6. Check the WAN connection type. To do so, launch the AmpliFi app. Select the AmpliFi router icon, and then select Internet under the settings subhead. Check that the Network Type is correct, your service provider can recommend the best Network Type for the service they are providing you.
7. If the AmpliFi router is replacing a router that was already in your network, try to clone the MAC address of the router being replaced. Launch the AmpliFi app and select the router icon, select the Internet option. Under the Other subhead toggle on "Clone MAC Address" and enter the old router's MAC Address. If you don't know what it is, search in your old router's support documentation to find out where/how you can view the MAC ID.
8. If you have fully performed all of these steps and the issue persists, try performing a factory reset of the AmpliFi router.
Go to article page.In the event that you are unable to connect a wireless printer or wireless security camera to the AmpliFi router's Wi-Fi please perform these steps:
Band Frequency
Some devices can only connect to a 2.4GHz frequency network. To solve issues related to this you can try two things:
1. You can disable Band Steering in the app to allow connection on 2.4GHz, as described in this article: Band Steering.
2. Create a separate SSID (WiFi network) that will only broadcast 2.4GHz on the router or mesh point (depending on the location of your device) and then have the device connect to that specific SSID: How to Add an Additional SSID.
WPS
An easy way to connect to your device is by enabling WPS (Wi-Fi Protected Setup). If your device supports WPS, then you can enable it on AmpliFi by following the steps in this article.
Next Steps
1. If neither of these work, you can clear the network history of the device. This has been noted as most helpful printers, but can help with any type of device that allows this sort of cleanup. This option can be found in most printer's main settings.
2. Restore printer (or device) to factory settings by resetting. These actions should erase the networking history of the device, allowing it to gain access to the AmpliFi wireless network (test with a 2.4GHz only SSID).
Go to article page.Documentation
Does the AmpliFi Androi app read my GPS position?
No, don’t worry. The app asks for Location permissions exclusively to find nearby AmpliFi routers. But there is no GPS street address or geographical location reading in our app.
Why does the AmpliFi Android app ask for Location permissions?
Google requires all apps to request users to grant Location permissions when performing discovery-related tasks. The AmpliFi app needs to request Location permission so your AmpliFi can be discovered by WiFi SSID (during setup), in network (when already set up) or when adding it in 3rd party mode via Bluetooth.
AmpliFi App needs Location permission only for these tasks - so Android allows the app to discover your AmpliFi router.
See more info on permission types in Google's official documentation:
Why does the AmpliFi Android app ask for Disk access permission when downloading support info?
Support info is first downloaded to your Android device before sending it to our Customer support for diagnostics. Android requires Disk access permission even for temporary downloads that will be shared with other apps (email, chats, instant messaging, etc).
Why can't the AmpliFi Android app discover my AmpliFi device anymore?
Check if you have disabled Location permission in your Android mobile's settings. That permission is required for the app to discover your AmpliFi device.
Why is there a Privacy Policy agreement? Do you collect any of my private data?
Google requires that all apps show the Privacy Policy agreement and procure user permission. But the data actually used by the AmpliFi team is not user private data, that would not be useful to us. We value your privacy and know how important it is, so the Privacy Policy will appear, even though the only the data read is that which helps improve the app.
The way it works is:
- When a crash happens, an anonymous crash report is logged to the Google-owned crash reporting service: Firebase.
- AmpliFi developers are then notified about which part of the app crashed and on which Android version it happened, so it can be fixed in an efficient manner.
More on Privacy Policy and User Data in Google's official documentation: Google: User Data.
Go to article page.This article includes most important details of each AmpliFi firmware release along with its date of release. The release notes are split in two separate sections, please click on the links below to see the correct release notes. See this article for information on where to see a device's current firmware version, how to upgrade and how to roll back to a previous version.
AmpliFi HD, Instant and Gamer Edition |
|
v4.0.3 (13-May-24)
v4.0.2 (13-Sept-23)
v4.0.1 (31-Jul-23)
v4.0.0 (1-Feb-23)
v3.7.1 (23-Aug-22)
v3.6.3 (30-Mar-22)
v3.6.2 (13-Oct-21)
v3.6.1 (06-Sep-21)
v3.6.0 (07-Jun-21)
v3.4.4 (08-Feb-21)
v3.4.3 (22-Oct-20)
v3.4.2 (18-Aug-20)
v3.4.1 (13-Jun-20)
v3.4.0 (12-Jun-20)
v3.3.0 (16-Mar-20)
v3.1.2 (29-Oct-19)
v3.1.1 (11-Sep-19)
v3.1.0 (07-Aug-19)
v3.0.1 (08-Jul-19)
v3.0.0 (12-Jun-19)
* Some functionality will be enabled with future app updates v2.9.5 (13-Mar-19)
v2.9.3 (19-Dec-18)
v2.9.2 (27-Nov-18)
v2.8.9 (02-Oct-18)
v2.8.5 (10-Sep-18)
v2.7.3 (09-May-19)
v2.7.1 (11-Jun-18)
v2.7.0 (06-Jun-18)
v2.6.3 (03-Apr-18)
v2.6.2 (20-Feb-18)
v2.6.1 (05-Feb-18)
v2.6.0 (26-Jan-18)
Known issue: Apple Watch Series 3 loses Wi-Fi connection when 802.11r option is enabled v2.4.3 (16-Oct-17)
v2.4.2 (02-Oct-17)
v2.4.0 (26-Sep-17)
v2.2.2 (25-Jul-17)
v2.2.0 (15-Jun-17)
v2.2.0 (15-Jun-17)
v2.1.1 (14-Apr-17)
v2.1.0 (03-Apr-17)
v2.0.0 (24-Feb-17)
v1.6.8 (01-Feb-17)
v1.5.2 (02-Dec-16)
v1.5.1 (22-Nov-16)
v1.4.2 (27-Oct-16)
|
AmpliFi Alien |
|
v4.0.6 (2-Jan-25)
v4.0.5 (29-Nov-23)
v4.0.4 (13-Sept-23)
v4.0.3 (31-Jul-23)
v4.0.2 (1-Jun-23)
v4.0.1 (15-Mar-23)
v4.0.0 (31-Jan-23)
v3.7.1 (31-Aug-22)
v3.7.0 (12-Jul-22)
v3.6.4 (25-Apr-22)
v3.6.2 (13-Oct-21)
v3.6.1 (13-Sep-21)
v3.6.0 (20-Jul-21)
* Initially available in web portal settings v3.5.2 (05-May-21)
v3.5.1 (22-Mar-21)
v3.5.0 (10-Mar-21)
v3.4.3 (11-Nov-20)
v3.4.1 (18-Aug-20)
v3.4.0 (18-May-20)
v3.3.1 (02-Apr-20)
v3.2.5 (08-Jan-20)
v3.2.4 (11-Dec-19)
v3.2.3 (25-Nov-19)
v3.2.2 (20-Nov-19)
v3.2.0
|

AmpliFi (AFI)
Download (6.2 Mb)
AmpliFi LR (AFI-LR)
Download (6.2 Mb)
AmpliFi HD (AFI-HD)
Open (Online)
AmpliFi HD Mesh Router (AFI-R)
Open (Online)
AmpliFi HD MeshPoint (AFI-P-HD)
Download (8.8 Mb)
AmpliFi Instant Mesh System (AFI-INS)
Open (Online)
AmpliFi Instant Router (AFI-INS-R)
Open (Online)
AmpliFi HD Gamer’s Edition (AFI-G)
Open (Online)
AmpliFi Alien (AFi-ALN-R)
Open (Online)
AmpliFi Datasheet
Download (9.7 MB)
AmpliFi Teleport Datasheet
Download (7.4 MB)
AmpliFi Instant Datasheet
Download (6.6 MB)
AmpliFi HD Gamer’s Edition Datasheet
Download (12.6 MB)
AmpliFi Alien Datasheet
Download (4.5 MB)
Replacements & Warranty
The Return policy of AmpliFi will depend on the store where it was purchased. If you made your purchase on the AmpliFi Store, you can find details about our return policy at https://www.ui.com/legal/amplifi-store/termsandconditions. You may contact the store team (store@amplifi.com) directly if you have questions about our return policy.
The AmpliFi Warranty covers replacements for up to one year from date of purchase (please read exact warranty details Here). You do not have to register your AmpliFi devices to activate the warranty.
If after contacting the AmpliFi support team to attempt resolve the issue with your hardware, and it has been diagnosed as having a hardware related issue, please fill out the online Return Merchandise Authorization (RMA) form.
You can scan the QR code on the devices using the camera of your smartphone or tablet to view the MAC ID.
Device MAC ID Addresses can also be found on the product box, or on stickers on the devices themselves.
If the RMA form does not auto populate the product based on your MAC ID, you will have a drop down option to select the model number for each product. Your devices packaging will have the model name, or you can search for the correct model in the device's Quick Start Guide.
The RMA process time frame can vary depending on processing and shipping. Please allow 5-7 business days for this process to finalize. To get information on the RMA process please feel free to email the RMA team for updates regarding your replacement here: rma@ui.com.
Go to article page.For some replacement processes or for configurations—particularly pairing a new AmpliFi MeshPoint or Router, it will be important to determine if it is a standalone device or if it was bought as part of a system, or kit. Devices that are bundled together in a kit are hard-coded to each other and therefore cannot be paired with any other device.
To extend your AmpliFi network or even your third party network, you must use standalone devices. If still shopping around, this link might be helpful: List of Standalone Devices.
How to Determine if a MeshPoint is Part of a Kit
MeshPoints that were sold bundled in a system will have two bar codes on the back. MeshPoints that originally were part of a kit cannot be paired with other devices.

How to Determine if a Router is Part of a Kit
Routers that were sold bundled in a system will show two MeshPoints in the AmpliFi app, even when the mesh points are not connected, they will appear offline. Routers that were sold bundled as part of a kit cannot be paired with other devices without a special unpairing firmware. For more information please contact our support team at help@amplifi.com.
Support
Get in touch with us
We’re here to help! Submit a request and one of our engineers will get back to you via email.